A broken security camera can leave your home or business vulnerable, especially when the cause isn’t immediately obvious. Whether you’re seeing a black screen, flickering feed, offline status, or no night vision, most problems stem from preventable causes like power failure, cable damage, or misconfigured settings. This guide walks you through diagnosing and fixing a broken security camera using proven troubleshooting techniques from professional installers and DIY experts.
You’ll learn how to pinpoint the exact cause of your broken security camera issue, apply fast effective fixes, and prevent future failures with simple maintenance steps. By the end, you’ll know exactly what to do when your camera stops working and how to get it back online fast.
Check Power Supply First
Power issues cause over half of all broken security camera problems. Before assuming hardware failure, confirm your camera is receiving stable power.
Test the Outlet and Adapter
Start at the source: the outlet and power adapter. Plug a lamp or phone charger into the same outlet to verify it is live. Inspect the power adapter for signs of damage like swollen casing, burnt smell, or frayed wires. If using a multi-camera system with a central transformer common in analog setups, ensure the main power supply is plugged in and its indicator light is on.
Use a multimeter to check voltage at the camera end. For 12V DC systems, you should read between 11V and 13V. Anything below 10.5V indicates voltage drop due to long cable runs or undersized wiring.
Swap with a Known Working Power Supply
If voltage is low or absent, disconnect the suspect adapter and replace it with a same-voltage equal-or-higher-amperage power supply. For example, use a 12V 2A instead of 12V 1A. Wait 10 seconds because many cameras take time to reboot after power restoration.
Never use an adapter with higher voltage like 24V on a 12V camera. This will destroy the unit.
Diagnose Daisy-Chained Power Systems
In systems where multiple cameras share one power line, unplug the red wire from the power connector at the camera and reconnect power. If the adapter’s light stays on, the power supply is good and the fault is in the cable or camera. If the light goes out, the power supply is defective or overloaded.
Inspect Cables and Connections

Damaged or poorly terminated cables are the second most common cause of broken security camera failures, especially in outdoor installations.
Look for Physical Damage
Trace the entire cable path and check for rodent bites, crushed sections, or cuts from lawn work. Inspect where cables enter walls, conduits, or junction boxes because these are common pinch points. For wireless cameras, examine internal battery connectors for corrosion.
Re-Terminate BNC or RJ45 Connectors
Loose or corroded connectors cause flickering or total signal loss. For analog BNC cameras, cut off the old BNC connector and strip the coaxial cable to expose the center conductor and braided shield. Crimp a new 75Ω BNC plug ensuring proper contact. For IP PoE cameras, replace damaged RJ45 connectors using a crimping tool or use a short patch cable to bypass the damaged section.
With BNC connectors, it is almost always a loose connector. They are difficult to crimp properly.
Seal Outdoor Connections
Moisture causes oxidation and intermittent faults. Wrap connections with silicone self-amalgamating tape because it bonds to itself and stays waterproof. Add heat-shrink tubing over crimped connectors and use weatherproof enclosures for junction boxes.
Diagnose Network Issues (IP Cameras)
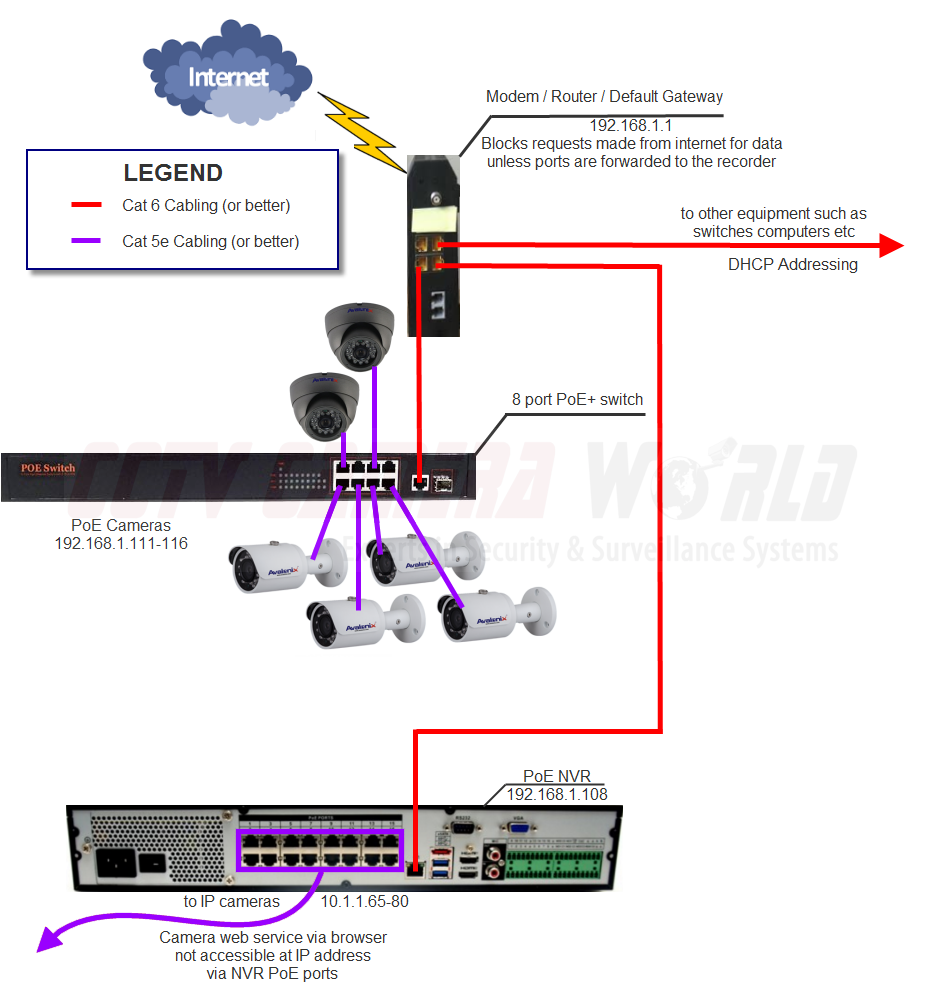
If your camera shows offline in the app but works locally, the problem is likely network-related, not the camera itself.
Test Wi-Fi Signal Strength
Weak signal causes disconnections and lag. Open your camera’s app and check signal bars or RSSI value. Below -70 dBm is considered poor. Temporarily move the router closer to the camera or connect the camera via Ethernet to rule out Wi-Fi issues.
Eliminate IP Conflicts
Two devices sharing the same IP address disrupt communication. On Windows, open Command Prompt and type arp -a to look for duplicate IP addresses. In your router settings, assign a static IP to the camera outside the DHCP range.
Reboot Network Hardware
Unplug your router and modem and wait 30 seconds before plugging them back in. Wait for full reboot then check if the camera reconnects. Using a PoE switch with built-in surge protection helps stabilize power and data delivery.
Rule Out Environmental Damage
Outdoor cameras face constant exposure to rain, sun, and temperature swings, leading to premature failure.
Check for Water Intrusion
Remove the camera from its mount and inspect for fog or condensation inside the housing. Look for discolored or corroded circuit boards and check if gaskets are cracked or missing. If you see white powdery residue on connectors, that is oxidation from moisture and likely fatal without professional repair.
Assess UV and Heat Exposure
Prolonged sunlight degrades plastic and electronics. Look for yellowed or brittle housings and touch the camera casing. If it is hot to the hand, internal temperatures may exceed safe limits. Install under eaves or use sun shields to reduce exposure.
Choose cameras rated IP66 or higher for outdoor use. IP67 means it can withstand temporary submersion.
Test for Hardware Failure
If power, cables, and network are all good but the camera still will not work, internal hardware may be dead.
Look for These Signs
Camera powers on but displays black screen. No red glow from IR LEDs in darkness. Burnt smell or visible damage inside the power supply. Constant rebooting or boot loops.
Perform a Lens and Sensor Check
Point the camera at a well-lit scene and access live view on a monitor, not just the app. If image is distorted, grainy, or missing, the image sensor may be damaged. Gently clean the lens with a microfiber cloth because dirt can mimic sensor failure.
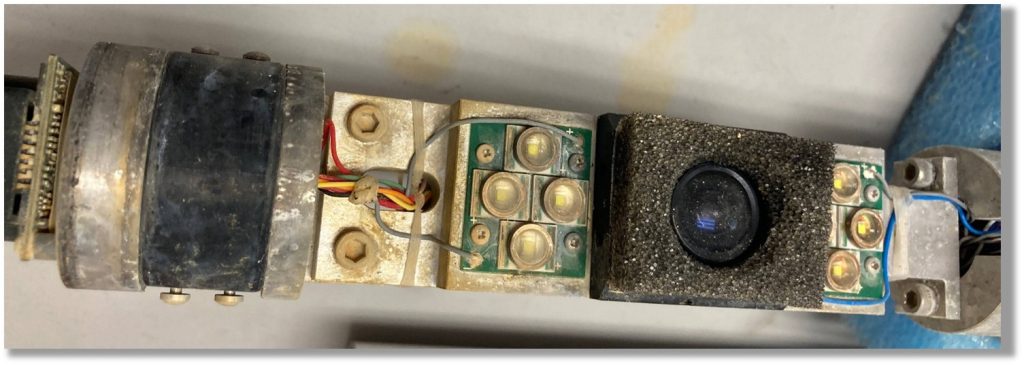
One of the electrolytic capacitors in the power supply has given up after being outside for a few years.
Update Firmware and Settings
Many broken camera symptoms are actually software glitches or misconfigurations.
Update to Latest Firmware
Visit the manufacturer website or use the app to check for updates. Download the correct version for your model and ensure stable power and internet during installation. Interrupting a firmware update can brick the camera.
Verify Critical Settings
Check if recording mode is set to motion or continuous in your NVR/DVR settings. Verify motion detection zones are enabled and sensitivity is not too low. Confirm night vision IR mode is turned on and LEDs are not blocked by dirt or paint. Check if notifications are disabled in the app.
Factory reset the camera if settings will not save or behavior is erratic.
Factory Reset as Last Resort
When all else fails, a factory reset clears corrupted software and restores default settings.
How to Reset
Locate the reset button, usually a small pinhole. Press and hold for 10 to 30 seconds until the LED flashes or changes color. Wait 2 to 3 minutes for reboot.
This erases Wi-Fi passwords, motion zones, and custom names. You will need to reconfigure everything.
When Reset Fails
If the camera remains unresponsive after a factory reset, it likely has a hardware fault. Contact manufacturer support, especially if under warranty. Consider replacement if the camera is older than 5 years.
Decide: Repair or Replace?
Not every broken security camera needs to be replaced. Use this decision framework to guide your choice.
Repair If
The issue is power, cable, or software. The camera is less than 3 years old. Replacement parts are available. Repair cost is under 50% of a new unit.
Replace If
Multiple cameras have failed, suggesting a systemic issue. There is water damage or burnt components. The model is discontinued. Technology is outdated, such as analog 720p versus 4K IP.
If your system is several years old and unreliable, a new system can offer sharper images, better night vision, and more advanced features.
Prevent Future Failures
Avoid repeat breakdowns with proactive care.
Clean Lenses Quarterly
Dust, pollen, and spiderwebs blur video. Use a microfiber cloth and lens cleaner. Trim foliage blocking the field of view.
Schedule Maintenance Biannually
Inspect cables and connections every 6 months. Test backup batteries every 3 months. Update firmware every 6 months. Check DVR/NVR storage monthly.
Use Surge Protection
Voltage spikes from storms or grid fluctuations kill electronics. Install surge-protected power strips. Use PoE injectors with surge suppression. Ground all metal conduits and mounts.
Real-World Case: System-Wide Failure After One Replacement
What Happened
A user replaced one water-damaged camera. Suddenly, six other cameras went offline, showing 0kb/s in the app despite having power.
Root Cause
The new camera drew more current, overloading a shared transformer. Miswiring during installation may have affected the common ground. Voltage fluctuation damaged the DVR input channels.
Fix
Disconnect all cameras and reconnect one by one to isolate the fault. Upgrade to a higher-capacity power supply. Consider switching to individual power runs or PoE.
Frequently Asked Questions About Broken Security Camera
Why does my security camera show no video but has power?
If your camera has power but shows no video, the problem could be a faulty cable, damaged connector, or internal hardware failure. Start by testing with a known working cable and checking BNC or RJ45 connectors for corrosion or looseness.
Can a broken security camera be repaired?
Yes, most broken security camera issues can be repaired. Power problems, cable damage, and software glitches are typically fixable. Hardware failure like a damaged image sensor may require replacement.
How do I know if my camera is getting enough power?
Use a multimeter to check voltage at the camera. For 12V DC systems, you should read between 11V and 13V. Below 10.5V indicates voltage drop from long cable runs or undersized wiring.
What causes multiple cameras to fail at once?
Multiple camera failures usually indicate a shared power supply problem or network issue. A defective transformer or daisy-chained power system can affect all connected cameras. Check your central power supply and router first.
How often should I maintain my security cameras?
Clean lenses quarterly and inspect cables and connections every 6 months. Test backup batteries every 3 months and update firmware every 6 months. This maintenance schedule prevents most common failures.
When should I replace instead of repair my security camera?
Replace if the camera is over 5 years old, has water damage, or costs more than 60% of a new unit to repair. Also consider replacement if technology is outdated or the model is discontinued.
Key Takeaways for Fixing Your Broken Security Camera
Most broken security cameras are not truly dead. They are often starved of power, choked by bad cables, or stuck in a software loop. Start troubleshooting by checking power supply and cables before assuming hardware failure. Over 80% of broken security camera issues can be resolved without replacement, often in under 30 minutes.
Regular maintenance, quality components, and smart installation go a long way in keeping your surveillance system running strong for 5 to 10 years. Use surge protection, keep firmware updated, and perform quarterly lens cleaning to prevent future failures. When in doubt, consult manufacturer support or a professional installer for complex issues.