Blurry security camera footage can render your entire surveillance system useless. Whether you’re trying to identify a suspicious visitor, read a license plate, or review a break-in, poor image clarity defeats the purpose of having cameras in the first place. The good news? Most causes of blurry video are fixable, often with simple, low-cost solutions.
This guide delivers a complete, step-by-step breakdown of why security cameras produce blurry footage and how to fix them fast. From dirty lenses and misfocused optics to network issues and aging hardware, we’ll walk through every possible cause with real-world diagnostics and actionable fixes. You’ll learn how to restore crystal-clear footage, prevent future problems, and know when it’s time to upgrade.
Clean Your Security Camera Lens for Crystal-Clear Video
A dirty lens ranks as the number one cause of blurry security camera footage. Even a thin layer of dust, water spots, or spider silk can scatter light and degrade image quality, especially in high-resolution 4K models where clarity expectations are highest.
Signs Your Lens Needs Cleaning
Your camera likely needs cleaning if you notice consistent haze across all footage, a milky or foggy appearance, or loss of fine detail like facial features or signage. These symptoms persist regardless of time of day or lighting conditions.
How to Clean Your Lens Safely
Turn off the camera and let it cool, especially if it’s been outdoors in direct sunlight. Use a microfiber cloth only, never paper towels or clothing, which can scratch the lens surface. For stubborn residue, dampen the cloth with 70% isopropyl alcohol or lens-safe cleaner, then gently wipe in circular motions. Avoid spraying liquid directly on the lens to prevent seepage into the housing.
Pro Tip: Check for spider webs near the housing. Spiders love nesting around camera domes and can leave silk strands directly over the lens, creating invisible obstructions.
Clean monthly for outdoor units and quarterly at minimum. Prevention beats constant troubleshooting.
Adjust Security Camera Focus for Sharp Footage

An out-of-focus lens produces uniformly soft or blurry images, even with perfect lighting and a clean lens surface. This common issue often occurs during initial installation or after the camera gets jostled by wind or vibration.
Manual vs. Auto-Focus Problems
Varifocal cameras require precise manual focus during installation. Wi-Fi and IP models may lose auto-focus ability over time or fail entirely in low-light conditions. Digital zoom abuse increases pixelation and mimics blurriness, so always use optical zoom when available.
How to Refocus Your Camera
For DVR and NVR systems like Lorex, right-click on the live view, open Camera Settings, and use the Focus slider or click Auto Focus. For cloud platforms like Verkada, Rhombus, or Ubiquiti, log into your dashboard, select the camera, and use the remote focus tool to fine-tune sharpness.
Focus is correct when edges of objects like door frames or license plates appear crisp rather than soft. If focus drifts after initial setup, recheck mounting stability to prevent future issues.
Fix Nighttime Blurriness Caused by Infrared Problems
Blurry footage only at night points to infrared (IR) issues as the likely culprit. Understanding how your camera’s night vision works helps diagnose and resolve these problems quickly.
Common IR-Related Causes
IR reflection occurs when infrared light bounces off glass, walls, or windows, creating a white haze that obscures details. Color night vision blur happens when this mode activates without enough ambient light, producing grainy, unfocused output. A faulty IR cut filter fails to switch to black-and-white mode, reducing sensitivity in darkness.
Quick Fixes for Night Vision Problems
Set Day/Night Mode to Auto in your camera settings to allow automatic switching to black-and-white IR mode when light drops. Enable Auto Night Vision in your camera app. Reposition the camera so it doesn’t face reflective surfaces like windows or bright walls. Add ambient lighting like LED floodlights to support color night vision without over-relying on IR.
Expert Note: In hot climates, thermal expansion can shift focus slightly at night. If footage sharpens during the day, this may be the cause. Consider re-focusing at night for optimal around-the-clock clarity.
Remove Internal Condensation and Fog from Camera Housing
Fog inside the lens housing causes sudden, persistent blurriness, especially in outdoor cameras exposed to humidity or temperature swings. This issue differs from a dirty external lens because internal moisture affects the optical path directly.
How to Diagnose Internal Fog
External cleaning doesn’t improve the footage. Blurriness worsens at night or after rain. You may see visible water droplets inside the housing, though this requires disassembly to confirm.
Repair: Internal Lens Cleaning

You’ll need a PH0 screwdriver, small pick, microfiber cloth, flashlight, and a silica gel pack. Start by removing the rear cover by twisting counterclockwise, then disconnect the battery if present. Unscrew the interior components, which typically include three to four screws with one recessed. Lift the motherboard after detaching connector tape, then remove the lens by unscrewing side mounts and twisting free. Clean both glass surfaces with your microfiber cloth, then add a silica gel pack inside the housing before reassembling everything in reverse order.
Ensure O-rings are intact and replace them if cracked or stiff. This procedure clears internal fog and prevents recurrence through moisture absorption.
Maximize Resolution and Bitrate Settings
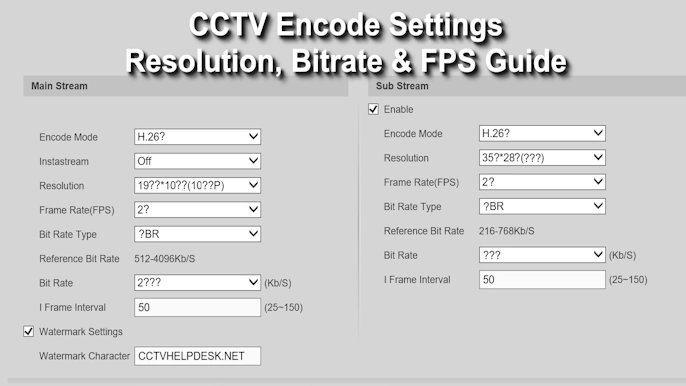
Even top-tier cameras produce blurry footage if settings are misconfigured. Many systems ship with conservative defaults that sacrifice clarity for storage savings.
Common Configuration Errors
Recording at 720p instead of 1080p or 4K wastes your camera’s potential. Low bitrate causes compression artifacts that look like blur. Low bandwidth or stream optimization modes enabled reduce quality intentionally. A mismatch between camera, recorder, and monitor resolution creates scaling problems.
How to Fix Resolution and Bitrate Settings
Set recording resolution to maximum in your DVR or NVR settings. Match your monitor to camera output, using a 4K display for 4K cameras. Increase bitrate to 4 to 6 Mbps for 1080p or 8 to 12 Mbps for 4K (up to 20 Mbps for high frame rate). Disable low-bandwidth or stream optimization modes. Reset to factory defaults if settings seem corrupted.
For Ubiquiti UniFi systems, adjust stream profiles in the Controller. For Verkada, use AI-enhanced clarity and per-camera tuning. For Lorex, right-click the live feed to access resolution and focus tools.
Warning: Low bitrate causes pixelation during motion, which is often mistaken for lens blur. Always check this setting first when diagnosing clarity issues.
Optimize Lighting and Exposure for Better Image Quality
Poor lighting doesn’t just reduce visibility. It creates noise, motion blur, and exposure imbalances that mimic blurriness. Addressing lighting problems dramatically improves footage clarity.
Lighting Challenges to Address
Low light increases grain and forces longer exposures, creating motion blur. Overexposure washes out faces and details. Backlighting leaves subjects appearing as dark silhouettes with no distinguishable features.
Solutions for Lighting Problems
Install supplemental lighting like dusk-to-dawn LEDs in dark areas. Use cameras with Wide Dynamic Range (WDR) or True WDR to balance bright and dark zones simultaneously. Enable Backlight Compensation (BLC) or Highlight Suppression in camera settings. Ensure IR range matches your scene depth, typically 30 to 60 meters.
Pro Tip: Avoid mounting cameras directly facing windows. Use corner mounts to angle away from glare and prevent whiteout conditions.
Replace Damaged or Low-Quality Camera Cables
Signal degradation from bad cabling causes ghosting, flickering, and blurry video, especially in analog systems and long PoE runs. This issue often affects only one camera while others remain clear.
Signs of Cable Problems
One camera appears blurry while others stay clear. Rolling lines or pixelation appear intermittently. The camera disconnects or shows signal loss periodically.
Fixes by System Type
For analog systems using coaxial BNC cables, replace RG59 with RG6 or Siamese cable. Use grounded power adapters to reduce interference. Isolate cables from motors, HVAC units, and fluorescent lights. For IP and PoE systems, upgrade from Cat5e to Cat6 or Cat6a. Use shielded cables in electrically noisy areas. Ensure proper grounding with PoE injectors or switches.
Test by swapping cables between cameras. If the blur moves to a different camera, the cable is faulty.
Reduce Network Congestion for IP Cameras
Wi-Fi and IP cameras rely on stable bandwidth. Network congestion leads to compression, lag, and blurry streams that degrade footage quality.
Bandwidth Requirements by Resolution
1080p cameras require 4 to 6 Mbps per stream. 4K cameras need 8 to 12 Mbps (up to 20 Mbps for high frame rates). Multiply by your total camera count to determine system bandwidth demands.
How to Improve Network Performance
Create a dedicated VLAN for security cameras to isolate traffic. Use managed switches with QoS to prioritize camera traffic over general network activity. Limit Wi-Fi usage during peak viewing times. Use local NVR storage instead of cloud-only streaming to reduce upload demands.
Run a speed test on the same network. Upload speed must exceed your total camera bitrate for smooth, clear footage.
Diagnose Aging or Failing Security Camera Hardware
Cameras degrade over time, especially after 5 to 10 years of continuous use. Understanding hardware limits helps you decide between repair and replacement.
Signs of Hardware Failure
Gradual loss of sharpness occurs over months or years. Color shifts or white balance errors appear. Autofocus becomes slow or unresponsive. IR LEDs dim or fail completely. Low-light footage shows increased noise.
Components That Wear Out
Image sensor sensitivity drops as the CCD or CMOS ages. Lens coatings deteriorate, reducing light transmission. The IR cut filter mechanism jams or fails. Internal seals fail, allowing moisture damage.
When multiple fixes fail and your camera exceeds 8 years old, replacement makes more sense than continued repair. Modern systems offer 4K resolution, HDR, AI noise reduction, and onboard storage that far surpasses legacy performance.
Stabilize Power Supply and Eliminate Electrical Interference
Unstable power causes flickering, rolling bars, and blurry video that mimics other issues. This problem often correlates with HVAC or appliance use.
Symptoms of Power Problems
Video distorts when HVAC systems or appliances run. Intermittent disconnects occur randomly. Flickering affects only one camera while others function normally.
Power Fixes for Security Cameras
Use dedicated circuits for security systems rather than sharing with other appliances. Install PoE+ (802.3at) or PoE++ (802.3bt) switches for stable power delivery. Test with a separate power adapter on a different outlet to isolate the problem. For analog systems, use electrical isolation transformers and proper grounding.
Warning: Voltage drops in long cable runs can cause underpowering. Use mid-span injectors if needed to maintain consistent voltage.
Follow This 10-Step Troubleshooting Workflow
Use this proven sequence to diagnose and fix blurry camera footage systematically. Skip steps only after confirming they’re not applicable.
Complete Diagnostic Steps
Visual inspection comes first. Check for dirt, damage, spider webs, or condensation on and around the lens. Clean the lens using a microfiber cloth and isopropyl alcohol. Verify focus using the auto-focus function or manual slider in your app or DVR. Check resolution and bitrate settings, setting them to maximum and disabling low-bandwidth modes. Assess lighting conditions and enable WDR or BLC if needed. Inspect all cables for kinks, corrosion, or loose connectors. Test network performance for IP cameras, measuring upload speed and checking for packet loss. Perform an isolation test by powering the camera separately on a different circuit. Update firmware by checking the manufacturer site or app for the latest version. Call a professional if all steps fail to resolve the issue.
Prevent Blurry Cameras with Routine Maintenance
Prevention costs less time and money than constant repairs. Establishing a maintenance schedule keeps your system performing at its best.
Recommended Maintenance Schedule
Clean the lens monthly for outdoor cameras, quarterly minimum. Inspect housing and seals quarterly. Check cable integrity biannually. Update firmware every 6 months. Verify focus and settings annually.
Best Installation Practices to Prevent Problems
Mount cameras under eaves to reduce weather exposure. Avoid pointing cameras at windows or walls to prevent IR reflection. Use pole or corner mounts for optimal viewing angles. Ensure tight seals and intact O-rings during installation.
Know When to Upgrade Your Security Camera System
Don’t waste time fixing outdated technology. Modern systems offer significant advantages over aging equipment.
Signs It’s Time to Upgrade
Cameras exceed 8 to 10 years old. Maximum resolution stays below 1080p. No night vision, WDR, or remote access capability exists. Frequent fogging, blur, or failure occurs regularly. Storage remains limited or relies on outdated methods.
Benefits of Modern Systems
4K resolution with AI object detection provides superior clarity. Onboard SD storage offers up to 365 days of retention. Cloud management from Verkada, Rhombus, and similar platforms enables remote access and diagnostics. Auto-tracking and smart alerts improve security response. Remote firmware updates keep systems current without manual intervention.
Top brands like Verkada, Ubiquiti, Rhombus, and Lorex offer self-maintaining, high-clarity systems worth considering for your upgrade.
Frequently Asked Questions About Blurry Security Camera Footage
Why does my security camera produce blurry footage only at night?
Nighttime blurriness typically stems from infrared problems. IR reflection from nearby surfaces creates haze, or the camera’s color night vision activates without sufficient ambient light. Set Day/Night Mode to Auto and reposition cameras away from reflective surfaces to fix this.
Can a dirty lens cause blurry video during the day and night?
Yes. A dirty lens affects footage regardless of lighting conditions. You’ll notice consistent haze or loss of fine detail. Clean the lens with a microfiber cloth and lens-safe cleaner to restore clarity.
How do I fix blurry footage on my IP camera caused by network issues?
Check your available bandwidth. 1080p cameras need 4 to 6 Mbps, while 4K cameras require 8 to 12 Mbps. Create a dedicated VLAN for cameras, use a managed switch with QoS, and consider local NVR storage instead of cloud streaming.
Should I repair or replace my 10-year-old security camera?
If your camera is over 8 years old and multiple fixes haven’t worked, replacement is smarter than continued repair. Modern cameras offer 4K resolution, AI noise reduction, better night vision, and remote management that older models cannot match.
Why does my camera produce blurry video even after cleaning the lens?
Persistent blurriness after cleaning points to internal condensation, focus misalignment, or hardware problems. Check for fog inside the housing, verify focus settings, and test with a different cable or power source to isolate the issue.
Key Takeaways for Fixing Blurry Security Camera Footage
Blurry security camera footage is rarely irreversible. Start with easy checks like cleaning the lens and verifying focus settings, then progress to technical diagnostics like checking cables, power supply, and network performance. Most issues resolve with these straightforward steps.
Prevention matters more than constant repair. Clean lenses monthly, update firmware regularly, and verify focus annually to maintain crystal-clear footage. Address problems early before they compound into larger issues.
If your system is outdated, consider upgrading to a modern cloud-managed platform. Newer systems offer superior image quality, remote diagnostics, and long-term reliability that make the investment worthwhile. For mission-critical sites, consult a professional integrator like Wired, iS3 Tech Services, or Lorex Support for expert diagnostics and tailored solutions.