Flickering or dim indoor flood lights can disrupt your home’s ambiance and compromise safety. Knowing how to replace indoor flood lights properly ensures reliable, long-lasting illumination without electrical hazards. Unlike outdoor units, indoor flood lights typically feature accessible bulb sockets and simpler wiring, but the same principles of safety, compatibility, and correct installation apply. This guide walks you through every step, from identifying your light type to final testing. You will learn how to avoid common mistakes like over-tightening bulbs, using incompatible wattages, or damaging seals, all while saving time and reducing future maintenance.
Confirm Replaceable Bulb Type
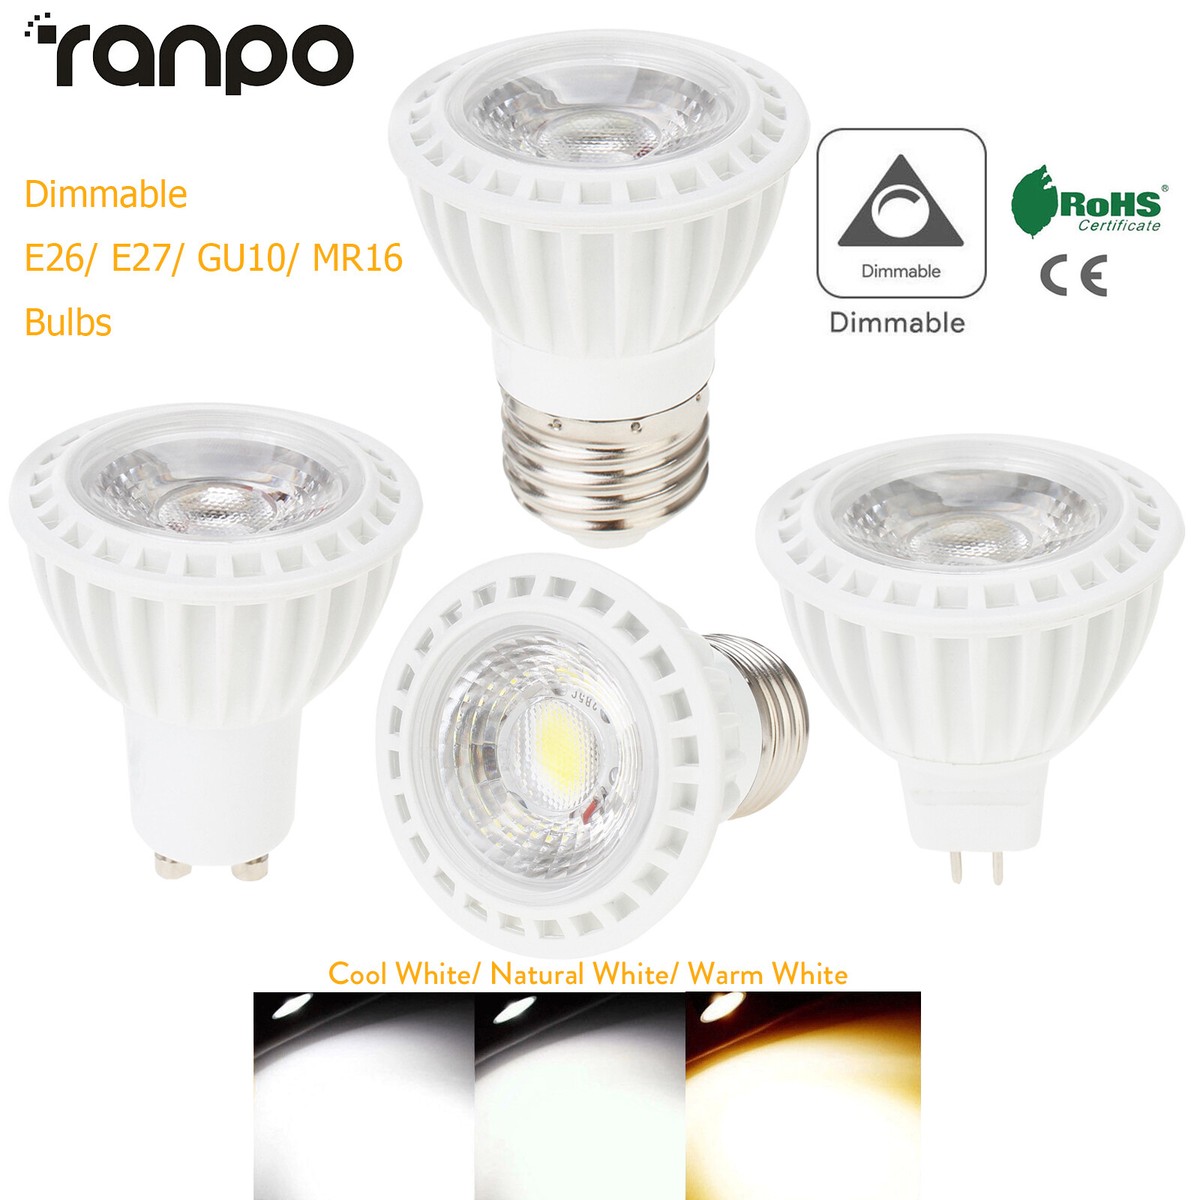
Before starting, determine if your flood light uses a replaceable bulb or is an integrated LED unit.
Check for Standard Socket Base
Inspect the fixture’s interior. If you see a screw-in base like E26 or E27, or a pin-style base such as GU10 or MR16, the bulb is replaceable. These are common in indoor recessed or track-mounted flood lights. Open the lens cover gently, as many units have clips or screws, and look for visible bulb threading.
Identify Integrated LED Fixtures
If there is no bulb, just a flat, sealed panel of LEDs, the unit is non-replaceable. These fixtures require full housing replacement when they fail. Do not attempt to pry open or disassemble them, as doing so voids warranties and risks electric shock.
Avoid Forced Removal
If the bulb resists turning, stop immediately. Corrosion or heat damage may have seized the base. Forcing it can crack the socket or damage wiring. Instead, power off, let it cool, and use a rubber grip pad for better traction.
Power Off and Safety Prep
Electrical safety is non-negotiable, even for indoor lights connected to live circuits.
Shut Off at the Breaker
Flip the correct circuit breaker to OFF. Do not rely solely on wall switches, as they may only interrupt the hot wire. Verify power loss using a non-contact voltage tester at the fixture.
Let Fixture Cool Down
Even LEDs generate heat. After turning off the light, wait 5–10 minutes before touching internal components. Hot glass or metal can burn skin and weaken seals during reassembly.
Gather Essential Tools
You will need:
– Voltage tester
– Ladder (for ceiling or high-mounted units)
– Screwdriver (Phillips or flathead)
– Replacement bulb or fixture (verified compatible)
– Wire nuts (if rewiring)
– Silicone caulk (for new installations)
Replace Flood Light Bulb Only
Use this method if your fixture has a standard socket and only the bulb has failed.
Open Fixture Cover Safely
Remove screws or release clips holding the lens. Lift the cover straight down to avoid pinching the gasket. Inspect the rubber seal. If it is cracked or misshapen, replace it to prevent overheating and dust buildup.
Remove Old Bulb
Grip the bulb firmly and turn counterclockwise. If stuck:
– Wear gloves to improve grip
– Use a rubber jar opener for traction
– Never use pliers, as they can shatter the bulb
If the base remains in the socket, turn off power again and use needle-nose pliers to gently twist it out.
Install New Bulb Correctly
Ensure the replacement matches:
– Base type (e.g., E26, GU10)
– Wattage (equal or lower than fixture rating)
– Color temperature (e.g., 2700K for warm white, 4000K for neutral)
– Indoor/outdoor rating (use indoor-rated bulbs only)
Screw the new bulb in clockwise until snug. Do not over-tighten, as this is a leading cause of socket damage.
Reattach Cover and Test
Align the gasket and snap or screw the cover back. Restore power and turn on the switch. Watch for:
– Instant illumination (no delay)
– No flickering
– Even light distribution
If issues persist, recheck bulb seating and power supply.
Replace Entire Flood Light Fixture
Choose this when the housing is damaged, wiring is exposed, or you are upgrading to LED for efficiency.
Remove Old Fixture
- Power off and verify with a tester.
- Unscrew mounting screws or nuts securing the fixture base.
- Lower the unit and expose the junction box and wires.
- Disconnect wires by untwisting wire nuts. Note: black (hot), white (neutral), green/bare (ground).
Prepare New Fixture
Unpack the new flood light and check included hardware. Confirm it is rated for indoor use and compatible with your ceiling type (drywall, ceiling joist, etc.).
Connect Wires Properly
Match wires by color:
– Black to black (hot)
– White to white (neutral)
– Green/bare to ground screw in box or fixture
Secure each pair with a wire nut, twisting until no copper is exposed. Tuck wires neatly into the junction box to avoid pinching.
Mount and Secure Fixture
Attach the base plate to the electrical box using provided screws. Ensure the fixture is level. Then, mount the flood light housing and tighten all fasteners.
Install Bulb (If Not Integrated)
For non-integrated units, insert the correct bulb now. Do not skip this step before sealing.
Seal and Finish Installation
Even indoor fixtures need protection from dust and minor humidity.
Check Gasket Alignment
Before closing, ensure the rubber seal sits flush in the groove. A twisted gasket reduces heat dissipation and shortens bulb life.
Reinstall Lens or Cover
Secure with screws or clips. Hand-tighten only, as overtightening cracks plastic housings.
Apply Caulk (For Ceiling Penetrations)
If the fixture creates a gap in the ceiling (e.g., can lights), apply a bead of silicone caulk around the trim to seal against air leaks and dust.
Test and Adjust Light Output
Final verification ensures safety and performance.
Restore Power and Activate
Turn the breaker back on. Flip the wall switch. The light should turn on instantly with steady brightness.
Verify Motion Sensor (If Equipped)
Wave your hand in front of the sensor. The light should trigger within 2–5 seconds. Adjust sensitivity or timer duration using the dial or app, per manufacturer instructions.
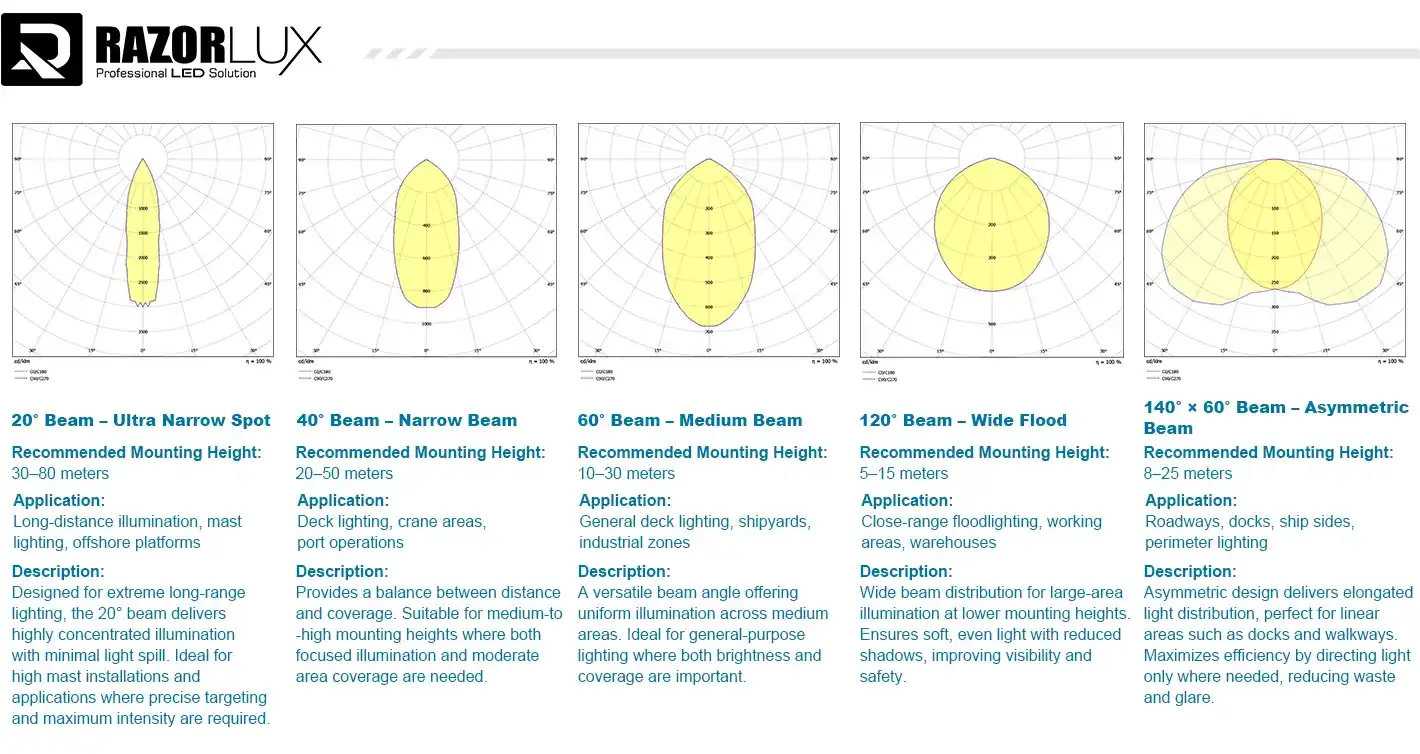
Adjust Beam Angle
For directional flood lights, loosen the tilt screws and reposition the head to focus light where needed, such as over a kitchen island or artwork.
Troubleshoot Common Issues

Quick diagnosis prevents repeated work.
Light Won’t Turn On
- Check power: Confirm breaker is on and switch is functional.
- Inspect bulb: Ensure it is seated and not defective.
- Test socket: Use a multimeter or swap in a known-working bulb.
- Verify wiring: Loose neutrals are a common cause.
Flickering or Dimming
- Over-tightened bulb: Loosen slightly and retighten gently.
- Incompatible dimmer switch: LED bulbs require LED-compatible dimmers.
- Voltage fluctuation: Consult an electrician if multiple lights flicker.
Sensor Not Responding
- Blocked lens: Clean with a dry microfiber cloth.
- Incorrect mode: Check if it is in “test” or “off” mode.
- Range too narrow: Reposition or adjust sensitivity dial.
Choose the Right Replacement Bulb
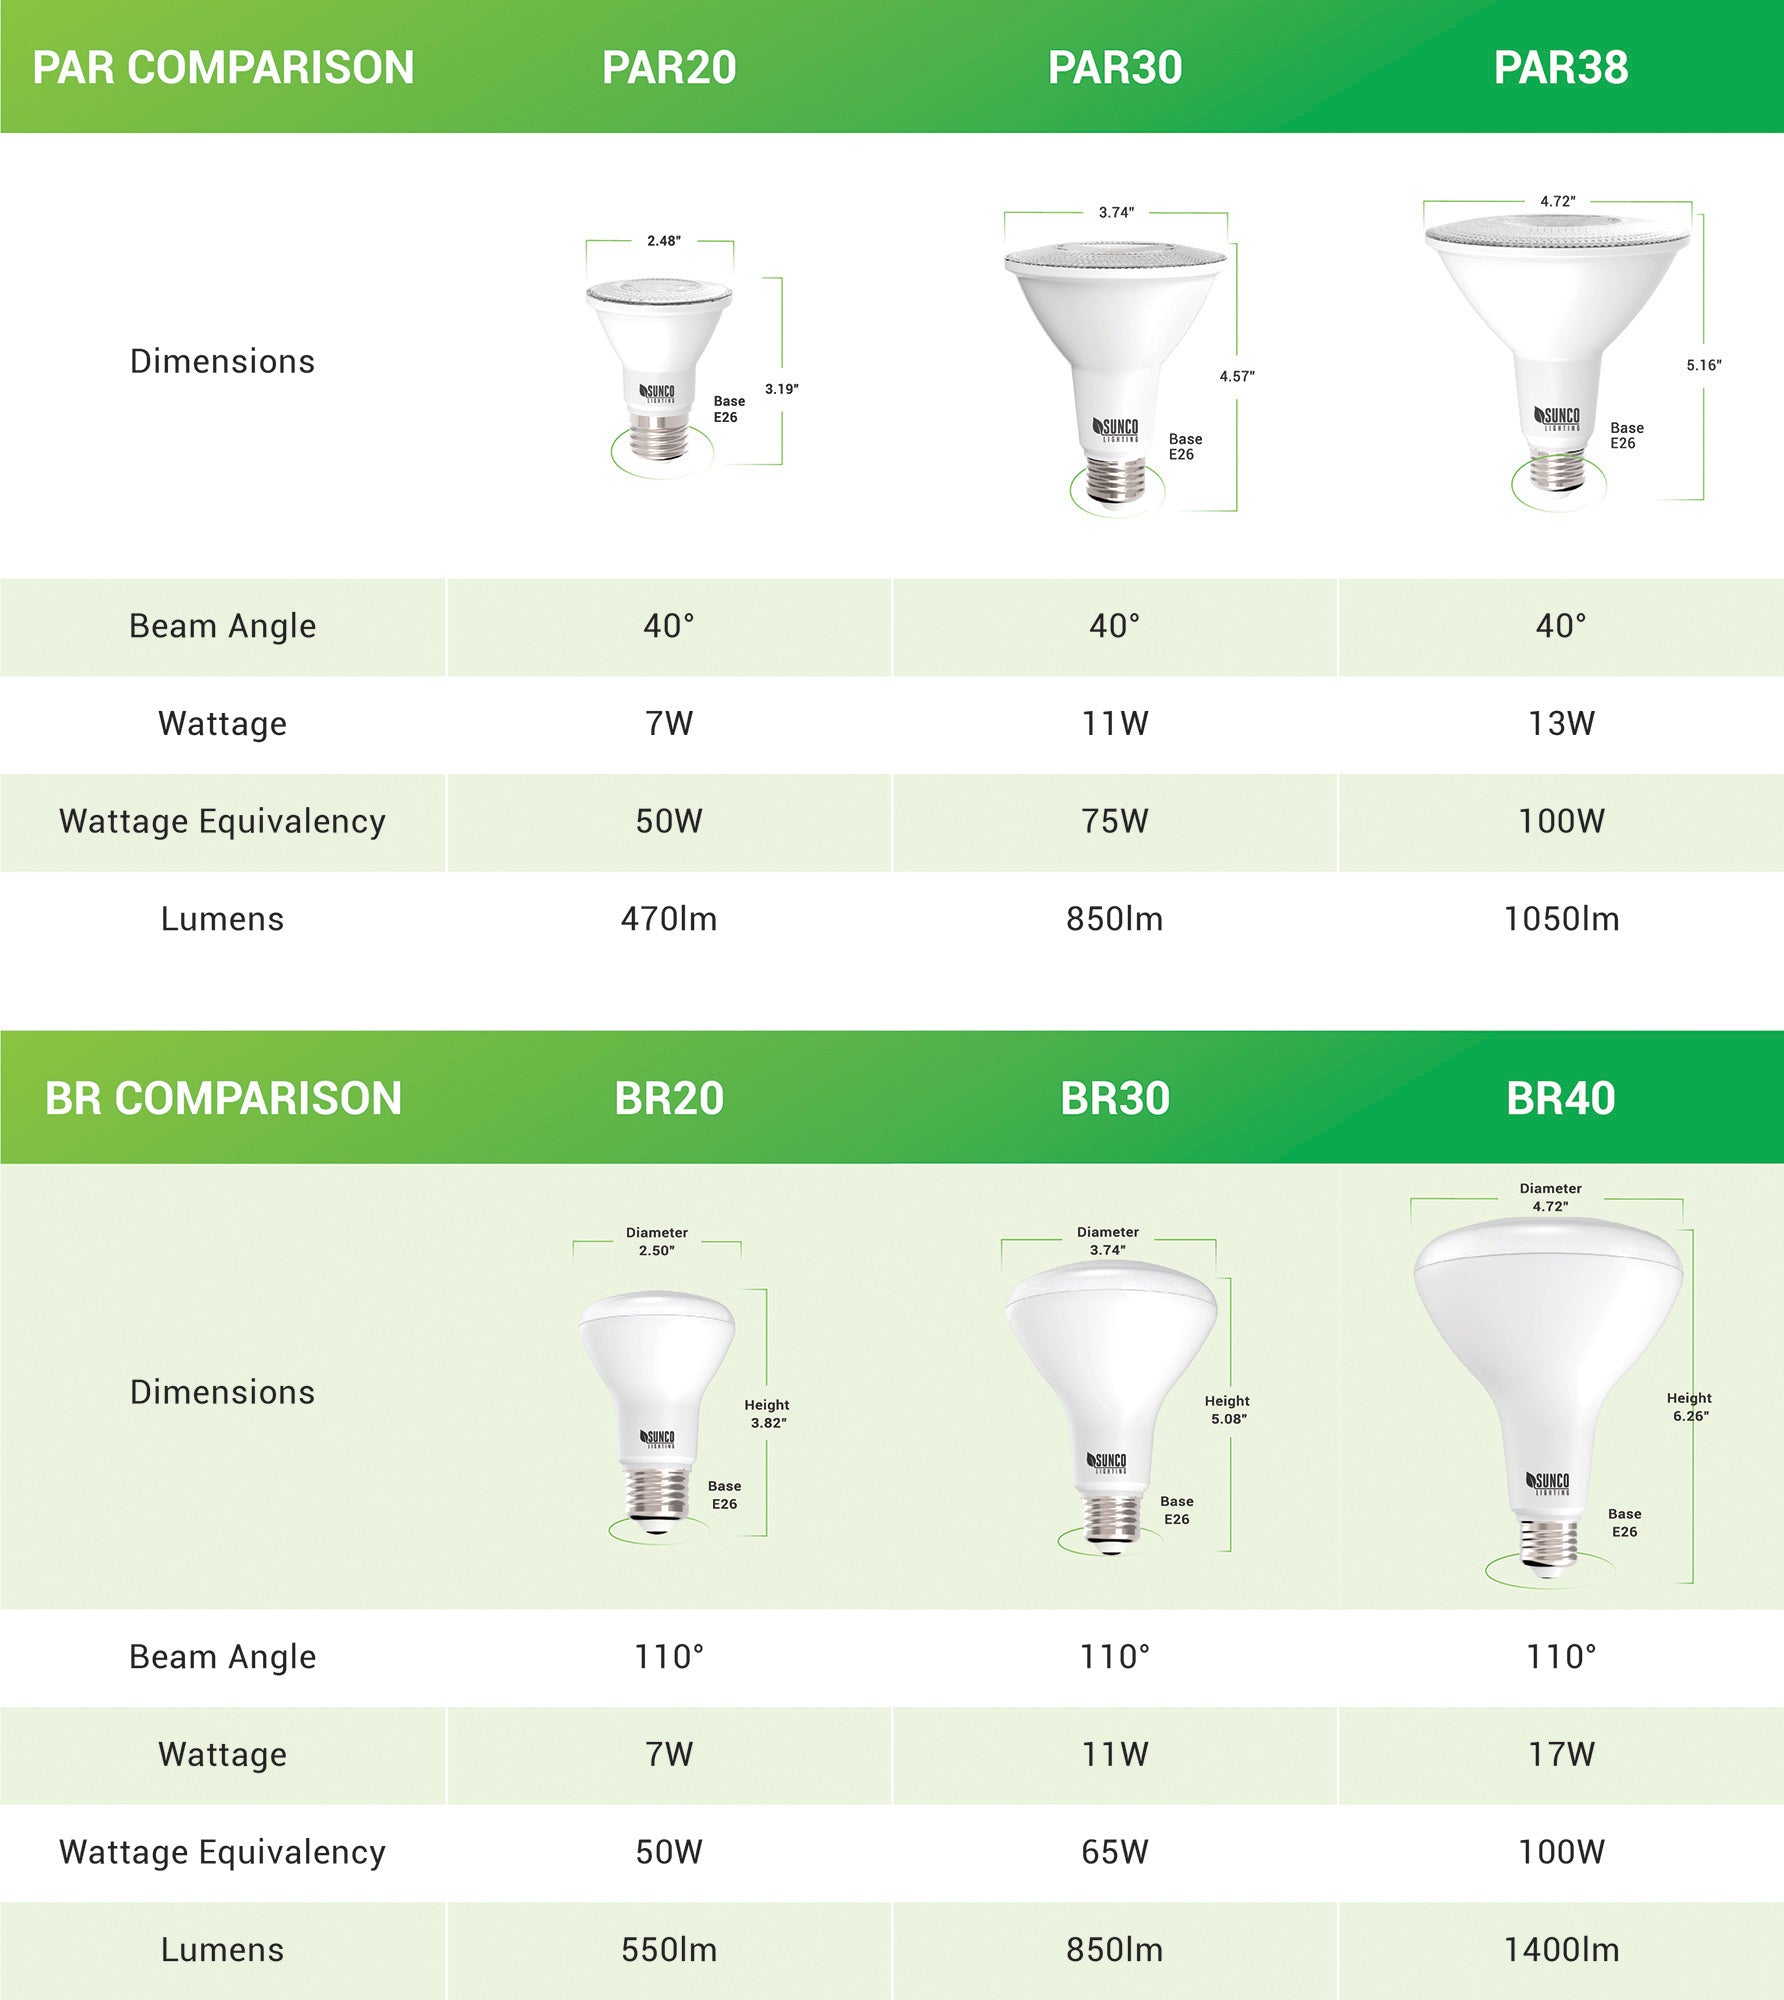
Matching specifications prevents failure and fire risks.
Match Base and Wattage
Use the old bulb as a template. Common indoor flood bases:
– BR30, BR40: Recessed can lights
– PAR20, PAR30: Track or display lighting
– GU10: Twist-lock, common in kitchens
Replace with equal or lower wattage. For example, a 60W max fixture can use a 45W LED.
Select Color Temperature
- 2700K: Warm, cozy (living rooms, bedrooms)
- 3000K: Slightly warmer white (kitchens, bathrooms)
- 4000K: Neutral white (garages, laundry rooms)
Prioritize Lumens Over Watts
LEDs use fewer watts for more light. Replace a 65W halogen with an 800-lumen LED (approximately 10W).
Prevent Future Problems
Smart habits extend light life and reduce replacements.
Don’t Over-Tighten Bulbs
Snug is enough. Over-tightening warps the base and damages the socket.
Clean Fixtures Regularly
Dust reduces light output by up to 30%. Wipe lenses every 3–6 months with a dry or slightly damp cloth.
Use Surge Protectors
Voltage spikes degrade LED drivers. Plug connected fixtures into surge-protected outlets.
Replace in Pairs
If one bulb in a set fails early, the others are near end-of-life. Replace together to maintain uniform lighting.
Upgrade to Smart Flood Lights
Consider Wi-Fi or Zigbee-enabled units for:
– Remote on/off control
– Scheduling
– Motion alerts
– Dimming via app
Ensure your home network supports the protocol before buying.
Frequently Asked Questions About Indoor Flood Light Replacement
How do I know if my indoor flood light bulb is replaceable?
Check for a visible socket (E26, E27, GU10, or MR16 base). If you see a flat sealed panel with no socket, the LED is integrated and non-replaceable. In that case, you must replace the entire fixture.
Can I use an outdoor-rated bulb inside my home?
Yes, outdoor-rated bulbs work indoors, but indoor-rated bulbs are typically sufficient. Using indoor-rated bulbs in indoor fixtures is the standard recommendation unless the location has moisture exposure.
What happens if I over-tighten the bulb?
Over-tightening can crack the socket, warp the bulb base, or damage wiring connections. Always tighten until snug, then stop. If the bulb resists, stop immediately to avoid socket damage.
Why does my new LED flood light flicker?
Common causes include an incompatible dimmer switch, loose wiring, or a defective bulb. LED bulbs require LED-compatible dimmers. If flickering continues, check the neutral wire connection or swap bulbs to isolate the issue.
Do I need to turn off the breaker to replace a flood light bulb?
Yes. Always cut power at the circuit breaker, not just the wall switch. Wall switches may only interrupt the hot wire, leaving the fixture energized. Verify with a voltage tester before touching any components.
How long do indoor LED flood lights typically last?
Quality LED flood lights last 15,000 to 25,000 hours under normal use. Integrated LED fixtures last as long as the driver and module, often requiring full replacement when they fail.
Key Takeaways for Replacing Indoor Flood Lights Safely
Replacing indoor flood lights is a straightforward DIY task when you follow safety rules and match components correctly. Always confirm bulb replaceability first, turn off power at the breaker, and use compatible, indoor-rated parts. Match the base type, wattage, and color temperature to avoid flickering or socket damage. When in doubt about wiring complexity or fixture compatibility, consult a licensed electrician. With proper installation, your new lights will deliver bright, efficient illumination for years.