Home security is a top concern for homeowners, and one of the most effective ways to protect your property is by installing security bars on windows. These sturdy metal fixtures deter intruders while still allowing natural light and ventilation. Whether you’re securing ground-floor windows or reinforcing high-risk entry points, properly installed security bars can significantly reduce break-in risks.
Installing security bars isn’t just about bolting metal to your window frame. Correct placement, secure mounting, and adherence to safety codes are essential. Poor installation can create weak points that compromise protection or block emergency escape routes. This guide walks you through every step of how to install security bars on windows safely and effectively, using basic tools and proven best practices.
You’ll learn how to measure your windows accurately, choose the right type of bars, secure them to different wall materials, and ensure emergency egress compliance. Whether you’re a DIY beginner or experienced homeowner, this step-by-step process will help you reinforce your home’s security with confidence.
Choose the Right Security Bar Type
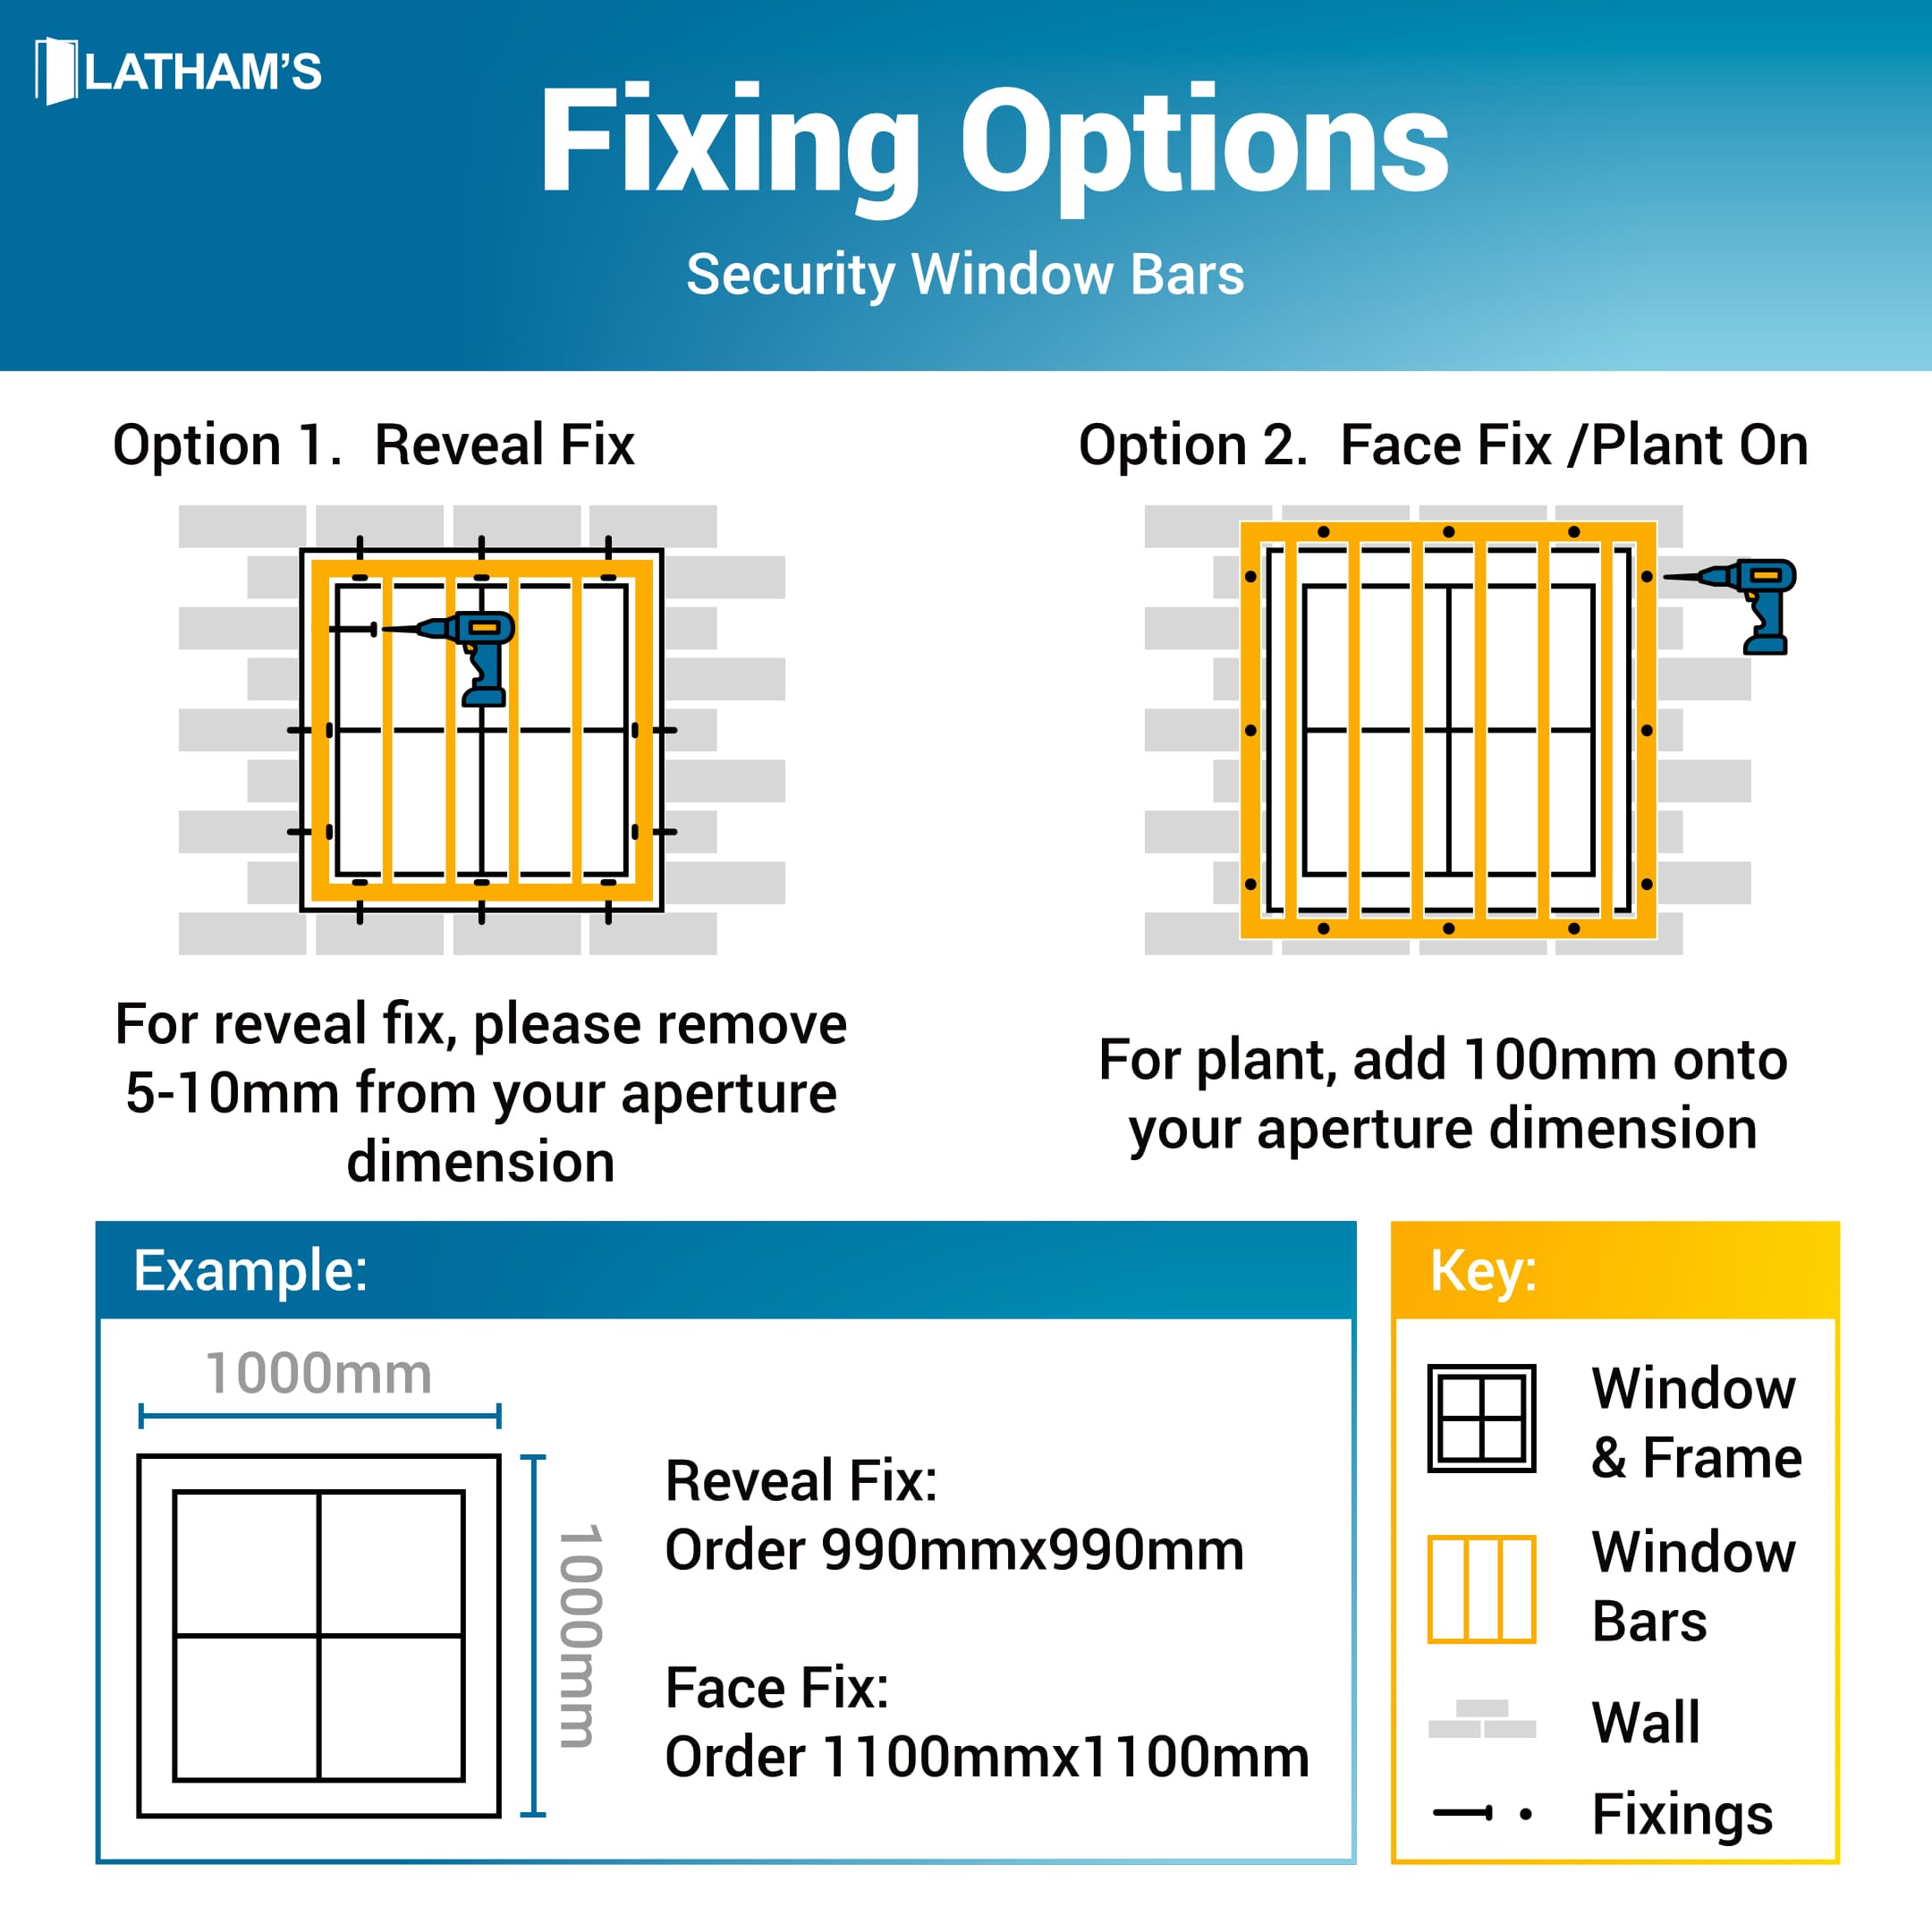
Selecting the appropriate security bars is crucial for both safety and functionality. Not all bars are designed the same way. Some prioritize maximum strength, while others focus on quick exit during emergencies.
Fixed vs. Hinged Security Bars
Fixed bars are permanently mounted and offer the highest level of protection. They work best for windows not intended for regular use as exits. However, building codes often restrict their use in bedrooms or living areas where emergency escape is necessary.
Hinged or removable bars allow quick release from the inside without tools. These are required by fire safety codes in sleeping rooms and other egress windows. Look for models with internal release mechanisms that only you can operate.
Material and Finish Options
Most security bars are made from steel, stainless steel, or wrought iron. Steel is strong and affordable but may rust over time unless coated. Stainless steel resists corrosion and requires minimal maintenance, making it ideal for humid climates. Wrought iron offers classic aesthetics and durability but costs more.
Choose powder-coated finishes to prevent chipping and rust. Black, bronze, or white coatings blend well with most window trims and enhance curb appeal.
Measure Windows Accurately Before Installation
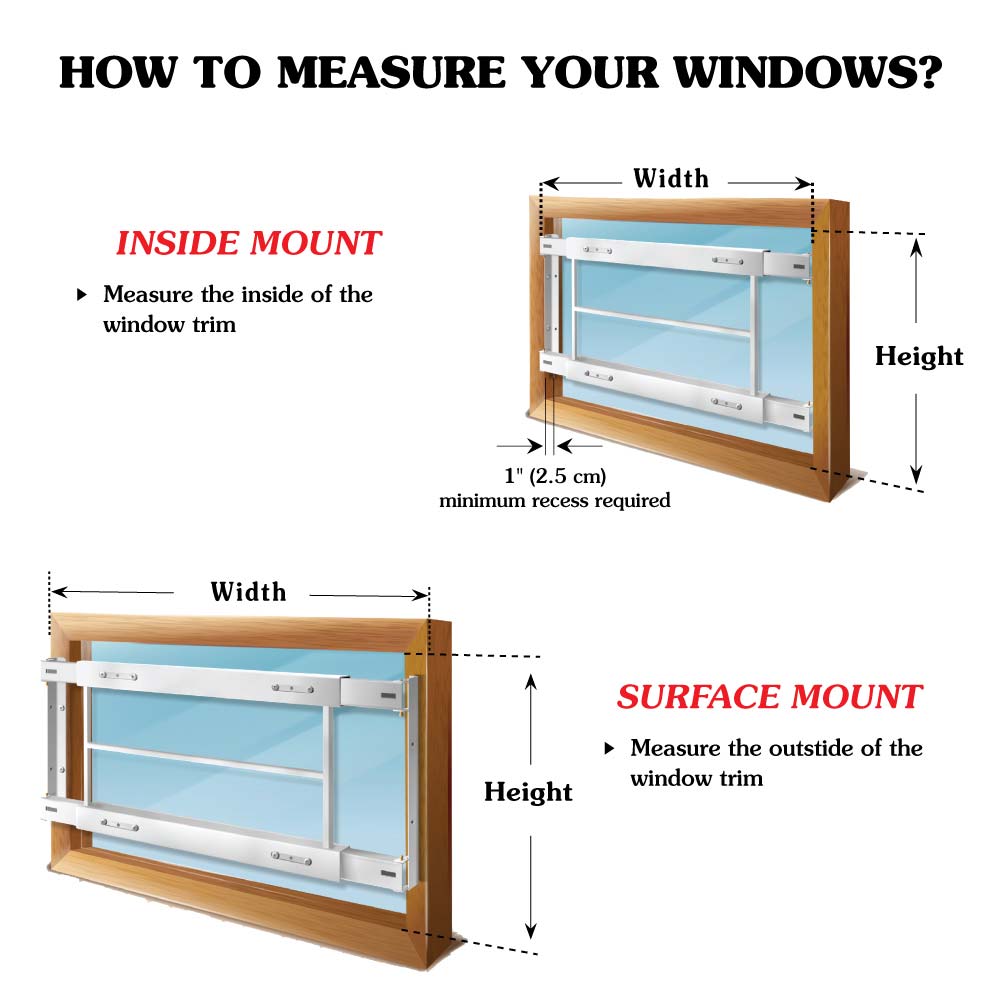
Proper measurements ensure a snug fit and eliminate gaps that could be exploited. Even a small miscalculation can weaken the overall protection.
Measure Width and Height Precisely
Use a steel tape measure for accuracy. Take three measurements across the width (top, middle, bottom) and height (left, center, right) of the window opening. Use the smallest dimension to determine bar size. This accounts for any out-of-square framing.
Always measure the interior window frame unless installing exterior bars. Note whether your window opens inward or outward, as this affects bar positioning.
Account for Mounting Depth
Check how far the bar extends into the window frame. The mounting flange must sit flush against solid material like brick, wood, or concrete, not just drywall. If mounting depth is insufficient, use extension brackets or adjust placement accordingly.
Avoid placing bars too close to the glass (less than 4 inches), as this can interfere with window operation and cleaning.
Gather Tools and Materials Needed
Having everything ready before starting saves time and prevents interruptions during installation.
Essential Installation Tools
- Power drill with masonry and wood bits
- Socket wrench or ratchet set
- Level (24-inch recommended)
- Measuring tape
- Pencil or marker
- Safety goggles and gloves
For masonry walls, use a hammer drill and carbide-tipped bits. For wood frames, standard drill bits suffice.
Required Hardware and Supplies
- Security bars with mounting flanges
- Lag bolts or masonry anchors (size depends on wall type)
- Wall plugs (for concrete or brick)
- Silicone sealant (for outdoor gaps)
- Touch-up paint (to cover drilled areas)
Ensure bolts are at least 3/16 inch thick and penetrate at least 1.5 inches into structural material for maximum hold.
Prepare the Window and Surrounding Area
Proper preparation ensures a clean, secure installation and protects your home’s structure.
Clear Obstructions and Protect Surfaces
Remove window screens, shutters, or nearby furniture. Cover the floor and windowsill with drop cloths to catch dust and debris. If working outdoors, avoid rainy or windy conditions to prevent moisture from entering drilled holes.
Inspect Frame and Wall Integrity
Check for rot, cracks, or crumbling mortar around the window. Repair damaged wood or masonry before installation. Weak framing can cause bolts to loosen over time, making bars ineffective.
Seal any existing gaps between the window frame and wall to prevent water infiltration after installation.
Mark and Drill Mounting Hole Locations
Accurate hole placement ensures bars remain level and evenly spaced under stress.
Position Bars and Use a Level
Hold the security bar in place according to manufacturer instructions. Most bars mount inside the window frame, spaced 3.5 to 4.5 inches apart. Use a level to ensure the bar is perfectly horizontal.
Mark each mounting hole with a pencil. Double-check alignment across all points before drilling.
Drill Pilot Holes Carefully
Start with a small pilot hole to guide the larger bit. For wood frames, drill slightly smaller than the bolt diameter. For masonry, use a hammer drill with an appropriate anchor-sized bit.
Drill straight into the wall. Angled holes reduce bolt grip. Blow out dust with compressed air or a straw to ensure clean insertion.
Secure Bars with Proper Fasteners

The strength of your installation depends on the quality and depth of fastening.
Use Structural Anchors for Maximum Hold
In wood frames, use lag bolts with washers for even pressure distribution. Tighten until the flange is flush, but don’t overtighten and strip the wood.
For concrete or brick walls, insert plastic or metal wall anchors before driving in screws. Expandable masonry anchors provide superior resistance to pulling forces.
Never rely on drywall anchors. They lack the strength needed for security applications.
Check Stability After Installation
Once all bolts are tightened, shake the bar firmly to test for movement. Any wobble indicates loose fasteners or inadequate support. Re-drill or add additional anchor points if necessary.
Ensure all bolts are seated tightly and that no sharp edges remain exposed.
Test Operation and Emergency Access
Security bars must protect without trapping occupants inside during emergencies.
Verify Quick-Release Mechanism (If Applicable)
For hinged or removable bars, test the internal release multiple times. It should open smoothly from the inside without keys or tools. Re-lock it to confirm it re-engages securely.
Keep the release mechanism accessible. Never block it with furniture or curtains.
Confirm Egress Code Compliance
Most building codes require at least one window per bedroom to be usable for escape. The opening must be at least 5.7 square feet, with a minimum height of 24 inches and width of 20 inches.
If bars reduce the usable opening below this, they violate fire safety regulations. Use removable bars or install a secondary exit like a door or roof window instead.
Maintain and Inspect Regularly
Even the best-installed bars degrade over time without proper care.
Clean and Inspect Twice a Year
Wipe down bars with mild soap and water to remove dirt and salt buildup. Check for rust, loose bolts, or paint peeling, especially in coastal areas.
Tighten any loose hardware and reseal outdoor gaps with silicone to prevent water damage.
Lubricate Moving Parts
For hinged or sliding models, apply a light lubricant to hinges and locks every six months. This prevents seizing and ensures smooth operation during emergencies.
Avoid over-lubricating, which can attract dust and grime.
Frequently Asked Questions About Security Bar Installation
Do security bars need to meet fire code requirements?
Yes. Most local building codes require that bedroom windows remain usable as emergency exits. Bars must not reduce the opening below 5.7 square feet, and quick-release mechanisms are often mandatory in sleeping areas.
Can I install security bars on any type of wall?
You can mount bars on wood, concrete, brick, or metal frames as long as you use the correct fasteners. Avoid mounting directly into drywall alone, as it cannot support the weight or force applied during a break-in attempt.
How long does it take to install security bars on one window?
For a single window with proper tools, installation typically takes 30 to 60 minutes. Larger windows or masonry surfaces may take longer due to drilling time and additional anchoring steps.
Should I install security bars on the inside or outside of the window?
Interior installation offers better protection against tampering and weather damage. Exterior installation can deter intruders before they reach the glass but may require additional weatherproofing and rust-resistant materials.
What is the strongest material for window security bars?
Hardened steel and stainless steel offer the highest strength-to-cost ratio. Wrought iron is also extremely durable and provides decorative appeal, though it requires more maintenance to prevent rust.
Can security bars be painted to match my home’s exterior?
Yes. Powder-coated bars accept most exterior paints after light sanding and priming. Use weather-resistant enamel to prevent peeling and fading over time.
Key Takeaways for Installing Security Bars on Windows

Installing security bars on windows is a powerful way to enhance home safety when done correctly. Choosing the right type, measuring precisely, and using structural fasteners all contribute to a secure installation. Always verify emergency egress compliance to protect occupants from fire hazards.
Regular maintenance, including biannual inspections and lubrication of moving parts, keeps your investment effective for years. For added protection, consider pairing bars with window sensors or motion-detecting lights. Start by measuring your most vulnerable windows today and gather the tools listed above to begin your installation with confidence.