
Installing motion detector flood lights is one of the smartest upgrades you can make for home security and nighttime safety. These fixtures automatically illuminate when movement is detected, scaring off intruders and lighting your path when you arrive home after dark. They also use far less electricity than traditional dusk-to-dawn lights because they only activate when needed.
This guide walks you through every step of the process, from planning placement and following electrical safety rules to wiring, calibration, and troubleshooting. Whether you’re replacing an old fixture or going with a no-wiring retrofit, you’ll learn how to get the job done right in under an hour.
Plan Your Light Placement

Focus on High-Traffic Entry Points
Position your motion lights near every exterior door, including the front, back, garage entry, and side gates. These are the most common access points for intruders, and sudden illumination is a powerful psychological deterrent. Covering each entrance ensures you never walk into a dark zone when coming home at night.
Cover Driveways, Walkways, and Patios
Extend coverage to driveways, patios, and pathways where people move after dark. This reduces tripping hazards and makes it easier to monitor activity around your home. For long driveways, install multiple fixtures to eliminate blind spots and maintain continuous detection from the street to the garage.
Avoid False Trigger Zones
Keep sensors away from areas with frequent non-threatening motion. Don’t aim them at busy sidewalks, streets, or your neighbor’s yard, where passing cars and pedestrians can set them off. Also avoid pointing them toward trees or bushes that sway in the wind, since movement from foliage is one of the top causes of false alarms.
Set the Right Mounting Height
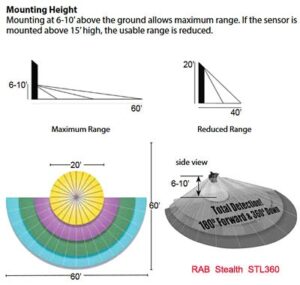
Mount 8 to 10 Feet Off the Ground
Mounting your flood light between 8 and 10 feet gives the sensor optimal detection range while reducing false triggers from pets and rodents. At this height, the infrared (PIR) sensor can effectively detect human-sized movement across a wide field without being overwhelmed by small animals below.
If you must mount lower (6 to 8 feet), angle the sensor slightly downward to reduce sensitivity to passing traffic or yard activity. Always check the manufacturer’s recommended height for your specific model.
Adjust the Detection Angle
Tilt the sensor head to focus on expected movement paths, like a walkway leading to your door, rather than open sky or distant roads. Most units allow vertical and horizontal adjustment. Use a level to ensure even alignment, especially when installing multiple lights on the same wall.
Avoid direct weather exposure by angling the fixture slightly downward, but make sure the sensor lens remains unobstructed at all times.
Follow Electrical Safety Rules
Turn Off Power at the Breaker
Before touching any wires, shut off power at the main electrical panel. Flipping the wall switch isn’t enough; always cut power at the circuit breaker to prevent shock. Label the breaker so no one accidentally reactivates it during installation.
Test Wires with a Voltage Meter
Even after turning off the breaker, verify wires are dead using a non-contact voltage tester. Touch the probe to each wire in the junction box (black, white, ground) to confirm no current is present. This step is critical, especially in older homes where wiring may not follow standard color codes.
Use GFCI Protection Outdoors
All outdoor circuits should be protected by a Ground Fault Circuit Interrupter (GFCI). This safety device cuts power instantly if it detects a current leak, such as from water intrusion, dramatically reducing the risk of electrocution. If your circuit isn’t GFCI-protected, consult a licensed electrician before proceeding.
Replace an Existing Fixture
Remove the Old Light
Start by removing the bulb and unscrewing the mounting screws or nuts holding the old fixture to the wall. Gently pull the fixture away from the wall to expose the wiring. Take note of how the wires connect, typically black to black, white to white, and ground to ground.
If the new fixture has a different base size, remove the old mounting plate and install the new one using the included template or hardware.
Connect the Wires Securely
Match the wires by color:
– Black (hot) connects to black
– White (neutral) connects to white
– Ground (bare or green) connects to ground
Twist each pair together with a wire connector (wire nut), then wrap the connection with electrical tape for added moisture resistance. Tuck the wires neatly into the junction box, making sure no bare copper is exposed.
Mount and Seal the New Fixture
Attach the fixture to the mounting plate using the provided screws. Once secure, apply a bead of silicone caulk around the edge of the wall plate where it meets the house. This creates a watertight seal and prevents rain from entering the electrical box.
After mounting, install the bulbs and any lenses or covers according to the manufacturer’s instructions.
Install Without Wiring (Retrofit Options)
Use Motion Sensor Bulbs
For a no-wiring solution, screw in a motion-sensing LED bulb. These bulbs contain a built-in PIR sensor and activate when they detect movement. They work in any standard outdoor socket and are ideal for porches, soffits, or enclosed fixtures.
Pros: Easy to install, affordable, portable.
Cons: Limited detection range; the entire unit must be replaced if the sensor fails.
Add a Socket Adapter
A motion sensor socket adapter screws into the existing socket, and then you screw a regular bulb into the adapter. This lets you keep your preferred bulb type (such as a high-lumen LED) while adding smart detection.
Pros: Sensor and bulb can be replaced separately; wider compatibility.
Cons: Adds visible bulk; may not fit in tight enclosures.
Calibrate Detection Settings
Adjust the Sensitivity Level
Most motion lights have a sensitivity dial (often labeled “SENS” or “RANGE”). Start with it set to medium. If the light triggers too often, such as when a cat walks by, turn it down. If it fails to detect people at the end of the driveway, increase the sensitivity.
Test by walking through the detection zone at different distances and speeds. Fine-tune until it reliably detects humans but ignores small animals and wind-blown debris.
Set the On-Time Duration
Use the timer dial (often labeled “TIME” or “DURATION”) to control how long the light stays on after motion stops. For security purposes, 1 to 5 minutes is usually sufficient. Longer durations waste energy and may annoy your neighbors.
Some models offer multiple modes like “test” or “manual on,” activated by rapidly flipping the wall switch. Refer to your manual to understand these features.
Fine-Tune the Detection Pattern
Aim the sensor so its field of view covers the area you want to monitor. Many sensors offer 120° to 270° coverage. Avoid pointing them at reflective surfaces or heat sources (like AC units), which can distort detection.
If your light has multiple heads, adjust each one independently to cover different angles, such as one facing the driveway and another toward the front walk.
Fix Common Problems
Light Stays On Constantly
If the flood light won’t turn off, check the following:
– The sensor is blocked by dirt, spider webs, or snow.
– Rapid switch toggling may have activated “manual on” mode. Turn power off for 10 seconds to reset.
– A faulty relay inside the sensor. Replace the fixture if cleaning and resetting don’t work.
Light Won’t Turn On
Troubleshoot in this order:
1. Check the circuit breaker; it may have tripped.
2. Replace the bulb, since even LEDs eventually fail.
3. Test voltage at the fixture with a meter.
4. Inspect wire connections, as loose neutrals are a common cause.
Frequent False Alarms
Common triggers include:
– Pets (especially large dogs)
– Swaying branches
– Heat from vents or grills
– Reflective surfaces
Solutions:
– Lower the sensitivity
– Re-aim the sensor
– Relocate the fixture higher
– Trim nearby vegetation
Maintain Your Flood Lights
Clean the Sensor Lens Regularly
Dust, grime, and spider webs reduce detection accuracy. Wipe the plastic sensor cover with a soft, damp cloth every few months. Never use abrasive cleaners or solvents.
Inspect Wiring and Seals Annually
Once a year, turn off power and check:
– Wire connectors for looseness or corrosion
– Silicone seal around the wall plate; reapply if cracked
– Mounting screws for tightness
This prevents water intrusion and electrical faults.
Trim Surrounding Foliage
Branches or bushes that grow into the sensor’s field of view can cause false triggers. Prune them back seasonally to maintain clear detection.
Choose the Right Motion Light
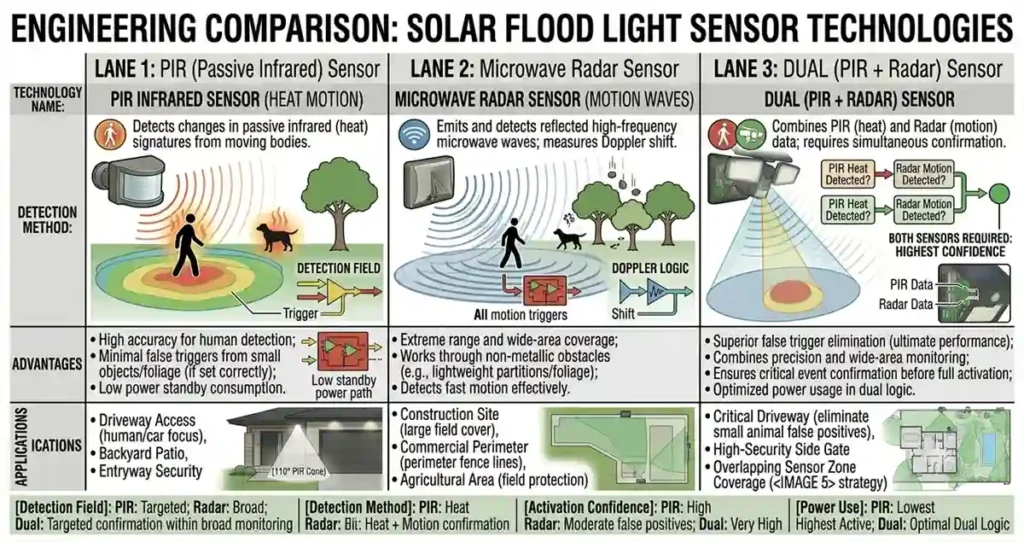
Compare Fixture Types
| Type | Best For | Wiring Needed |
|---|---|---|
| Wall-Mounted Flood Light | Doorways, garages | Yes |
| Pathway Light | Walkways, gardens | Optional (solar/wired) |
| Solar-Powered Light | Remote areas, sheds | No |
| Smart Motion Light | App control, automation | Yes |
Check Key Specs Before Buying
- Lumens: 1000+ for security; 300 to 700 for pathways
- Detection Range: 20 to 30 feet minimum
- IP Rating: IP44 or higher for weather resistance
- Color Temperature: 4000K to 5000K (cool white) for clear visibility
Frequently Asked Questions About Motion Detector Flood Lights
Do motion detector flood lights work during the day?
Most models have a photocell or daylight sensor that prevents activation in bright conditions. This saves energy and extends bulb life. Some units allow you to override this feature for 24-hour operation if needed.
How do I stop my motion light from triggering on small animals?
Lower the sensitivity setting and mount the fixture between 8 and 10 feet high. Aim the sensor slightly downward to focus on human-sized movement at waist or chest level rather than ground-level activity.
Can I install a motion sensor light without existing wiring?
Yes. Motion sensor bulbs and socket adapters screw into any standard outdoor fixture and require no electrical work. They’re a quick, affordable option for renters or anyone avoiding hardwired installations.
Why does my motion light stay on all night?
Common causes include a dirty sensor lens, activation of “manual on” mode from rapid switch toggling, or a failed internal relay. Clean the lens, reset power for 10 seconds, and replace the fixture if the issue persists.
Are LED motion flood lights worth the extra cost?
Yes. LEDs use significantly less energy, last much longer than incandescent or halogen bulbs, and produce brighter light with less heat. Over time, the energy savings and reduced replacement frequency more than offset the higher upfront price.
Do I need an electrician to install a motion flood light?
Most homeowners can handle a straightforward fixture replacement using existing wiring. However, if you need new wiring, aren’t comfortable working with electrical circuits, or your home lacks GFCI protection, hiring a licensed electrician is the safest choice.
Key Takeaways for Installing Motion Detector Flood Lights
Installing motion detector flood lights is a straightforward DIY project that delivers major benefits in security, safety, and energy savings. Start by planning your placement to cover entry points, driveways, and walkways while avoiding false trigger zones like busy sidewalks or swaying trees. Mount fixtures between 8 and 10 feet high, and always cut power at the breaker before doing any electrical work.
After installation, take time to calibrate the sensitivity and timer settings so the light responds to real threats without constant false alarms. Clean the sensor lens annually and trim nearby foliage to keep the system running reliably for years.
Your next step: grab a voltage tester, pick up a fixture that matches your needs, and set aside a weekend afternoon. With the right preparation, you’ll have a brighter, safer home by sundown.