
A dark driveway or unlit backyard can feel like an open invitation to trespassers. Installing a floodlight security camera solves that problem in a single step, combining bright illumination, HD video, and motion alerts into one weatherproof unit. Once mounted and connected, you get real-time visibility and instant notifications straight to your phone.
This guide covers everything you need to know about how to install floodlight security camera systems, from choosing the perfect spot to wiring, sealing, and testing. Whether you have existing wiring or need a wire-free solar option, you will find clear steps and expert tips to complete the job safely and confidently.
Pick the Right Mounting Location

Mount at Least Nine Feet High
Position your floodlight security camera at least nine feet above the ground. This height widens the camera’s field of view, reduces blind spots, and makes the unit harder to tamper with. It also keeps the floodlight beam angled downward for better coverage of walkways, doors, and driveways.
Balance Light and Camera Angles
Aim the camera so its lens and the floodlight beam cover the same area. Avoid pointing the lens at trees, reflective windows, or busy streets that trigger false alerts. If your camera app offers a live preview, use it to test the angle before final mounting.
Reduce Glare and Shadows
Place the floodlight above the camera whenever possible. This setup minimizes lens glare and prevents harsh shadows under a person’s face. If your model has a fixed light position, check the design before drilling so you can plan around it.
Turn Off Power at the Breaker
Identify the Correct Circuit
Head to your main electrical panel and switch off the breaker labeled “Outdoor,” “Porch,” or “Floodlight.” If labels are missing or unclear, turn off breakers one at a time while checking whether the existing light loses power.
Verify the Power Is Off
Use a non-contact voltage tester on the wires inside the junction box. Hold the tester near each wire. If it does not beep or light up, the circuit is safe to work on. Never skip this step or assume the power is off.
Warning: Contact with live wires can cause serious shock or fire. Always test before touching any conductor.
Mount the Support Bracket
Use the Included Template
Most floodlight camera kits include a mounting template. Hold it flat against the wall or eave and mark the screw holes with a pencil. Check that the template is level using a small bubble level, especially on textured surfaces like brick or stucco.
Choose the Right Anchors
Select fasteners based on your wall material:
– Wood or vinyl siding: #10 exterior screws
– Brick or concrete: Masonry anchors
– Stucco: Plastic or metal expansion anchors
Drive the screws into wall studs or directly into the junction box for a stable hold. The bracket must support the full weight of the unit, particularly in windy locations.
Connect the Wires Safely

Match the Wire Colors
When replacing an existing floodlight, connect the wires by color:
– Black (hot) to black
– White (neutral) to white
– Green or bare copper (ground) to the grounding screw or wire
Twist the ends together using wire nuts, then wrap each joint with electrical tape for extra hold.
Ground the System
Attach the floodlight camera’s copper ground wire to the green grounding screw on the bracket or junction box. Proper grounding protects the device from power surges and ensures safe operation.
Make Weatherproof Connections
Outdoor wiring needs extra protection. Use weatherproof wire nuts, seal joints with silicone sealant, and tuck all wires neatly into the junction box. Leave six to eight inches of slack inside the box for future servicing.
Pro Tip: Leaving slack makes it easier to remove or replace the unit later without re-running wires.
Attach the Floodlight Camera Unit
Snap or Screw the Unit Into Place
Depending on your model, the floodlight camera either snaps onto the bracket with a locking tab or screws in using the included hardware. Follow the manual closely and avoid forcing parts, since misalignment can crack seals or break connectors.
Seal the Base Against Moisture
Run a bead of outdoor-rated silicone caulk around the base where the unit meets the wall. This barrier blocks rain, insects, and dust from entering the junction box and damaging the wiring.
Test the System Thoroughly
Restore Power and Check the Lights
Flip the breaker back on and test the floodlight using the app or wall switch. Both bulbs should power up fully and respond to motion triggers without delay.
Confirm Camera and Audio Functions
Open the companion app on your phone and verify the following:
– Live video feed loads correctly
– Motion detection zones are accurate
– Night vision produces clear images
– Two-way audio works both ways
Adjust the viewing angle if needed before tightening all screws.
Calibrate Motion Sensitivity
Set the motion sensitivity to a level that catches people and vehicles but ignores pets or swaying branches. Use custom detection zones to focus on driveways, entry points, or other high-priority areas.
Install a Floodlight Camera Without Existing Wiring
Choose a Solar or Battery Model
If you do not have outdoor wiring, pick a solar-powered or battery-operated floodlight camera. These units mount almost anywhere with decent sunlight and a strong Wi-Fi signal, making them ideal for sheds, fences, or detached garages.
Run New Wires from an Indoor Source
For a wired camera without existing wiring, you can run a new line from an indoor outlet or the breaker panel. Use electrical conduit to protect the cable along walls, eaves, or attic spaces.
Pull Cable with Fish Tape
- Drill a small hole from inside to outside near the mounting spot.
- Feed fish tape from outside to inside.
- Attach the electrical cable to the fish tape and pull it back through.
- Connect the cable to a new circuit or junction box inside.
Note: Local building codes may require a permit for new electrical runs. Check with your municipality before starting.
Mount a New Junction Box
Install a weatherproof junction box on the exterior wall. Connect the incoming power wires to the floodlight camera using wire nuts, then seal all openings with rubber grommets and silicone caulk to keep moisture out.
Optimize Camera Placement and Settings
Aim at Key Entry Points
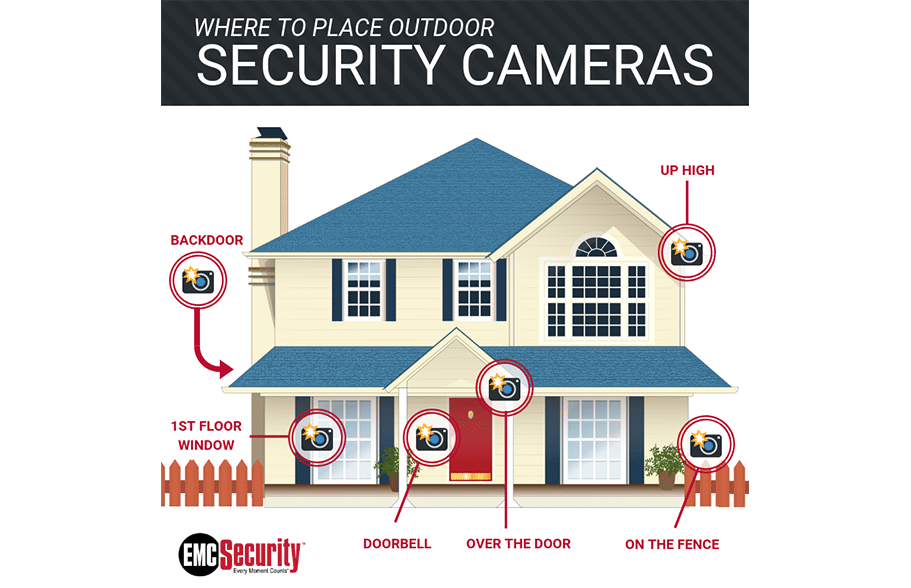
Point the lens toward the most important areas of your property:
– Front and back doors
– Garage entrances
– Driveways
– Dark corners or side gates
Avoid aiming at neighbors’ windows or busy sidewalks to respect privacy and reduce unnecessary alerts.
Choose a Light Activation Mode
Most floodlight cameras offer several lighting modes:
– Motion-only: Lights flash when movement is detected
– Always-on at night: Constant illumination after dark
– Scheduled: Lights follow a set timer
– App-controlled: Manual activation from your smartphone
Pick the mode that matches your security needs and adjust it seasonally if needed.
Troubleshoot Common Installation Problems
No Power After Installation
- Confirm the breaker is fully ON
- Test wires again with a voltage tester
- Check for loose or reversed wire connections
- Make sure any wall switch in the circuit is ON
Camera Offline or Wi-Fi Drops
- Move your router closer or install a Wi-Fi extender
- Avoid mounting near metal walls or thick concrete that block signals
- Power cycle the camera by turning the breaker off and on
Lights Stay On or Flicker
- Lower the motion sensitivity in the app
- Clean cobwebs or debris from the lens and sensors
- Update the firmware through the app
Maintain Your Floodlight Camera Long-Term
Clean the Lens and Lights Every Three Months
Wipe the camera lens with a microfiber cloth and remove dust, spider webs, or pollen from the floodlights and motion sensors. Check the silicone seals for cracks and reapply caulk if needed.
Inspect the Mount and Wiring
Look for loose screws, corroded wire nuts, water inside the junction box, or frayed cables. Tighten hardware and reseal any gaps to prevent long-term damage.
Keep Firmware Updated
Enable automatic firmware updates in the app. Updates deliver security patches, improved AI detection, and new features that keep your system performing at its best.
Cost of Installing a Floodlight Security Camera
| Installation Option | Cost Range | Notes |
|---|---|---|
| DIY wired | $150–$300 | Device cost only, no labor fees |
| DIY wireless or solar | $200–$400 | No wiring needed, easiest setup |
| Professional installation | $350–$900+ | Includes labor, wiring, and permits |
Costs rise when new wiring, multiple cameras, or electrical panel upgrades are involved.
Recommended Floodlight Camera Models

Reolink Solar Floodlight Cam
This wire-free, solar-powered unit installs in minutes with no electrician required. It delivers 2K resolution, a 150-degree field of view, and adaptive lighting that adjusts to the scene. Mount it on eaves, fences, or sheds with direct sunlight.
Key Features:
– 1000-lumen floodlight
– AI person and vehicle detection
– Continuous solar charging
– Two-way audio with built-in siren
Reolink Duo Floodlight PoE or WiFi
For wider coverage, the Duo model uses dual lenses to deliver a 180-degree panoramic view. Choose Power over Ethernet for a stable hardwired connection or WiFi for easier setup.
Highlights:
– 4K 8MP resolution
– 1800-lumen floodlights
– Smart detection with instant app alerts
– Built-in microphone and speaker
Frequently Asked Questions About Floodlight Security Camera Installation
Do I need an electrician to install a floodlight security camera?
Not always. If you are replacing an existing light and feel comfortable with basic wiring, a DIY install is safe. For new circuits or complex electrical work, hiring a licensed electrician is the smarter choice.
Can I install a floodlight camera by myself?
Yes. Most floodlight cameras are designed for DIY installation with clear manuals and companion apps. Following safety steps and double-checking connections is usually all it takes.
Where is the best place to put a floodlight camera?
Focus on high-traffic entry points like front corners of the house, garage sides, and backyard gates. Make sure the location also has a strong Wi-Fi signal for reliable streaming.
Should the floodlight be above or below the camera?
Above is best. It reduces lens glare and evenly illuminates faces for clearer video. Many models have fixed light positions, but when adjustable, always place the light above the lens.
How long does it take to install a floodlight camera?
A straightforward replacement takes about one to two hours. Installing new wiring or a solar-powered unit can take two to four hours depending on the complexity.
Key Takeaways for Installing Your Floodlight Security Camera
Learning how to install floodlight security camera systems is well within reach for most homeowners. Start by choosing a location at least nine feet high with strong Wi-Fi, shut off power at the breaker, and mount the bracket using the right anchors for your wall. Match wire colors carefully, ground the system, and seal every connection against moisture before testing.
If you lack existing wiring, a solar or battery-powered model offers a fast, wire-free solution. Once installed, fine-tune the motion zones, light modes, and camera angles for the best coverage. With regular cleaning and firmware updates, your floodlight security camera will deliver reliable, around-the-clock protection for years to come.