
A flood light that won’t turn on, flickers at random, or burns out too soon can leave your property dark and vulnerable. If you’re searching for how to fix flood light problems, the answer is often simpler than you think. Most issues trace back to a handful of replaceable parts rather than the LED chips themselves. This guide walks you through diagnosing the real cause, performing safe repairs, and knowing when replacement makes more sense.
Confirm Power Supply First
Before opening anything, rule out basic power problems. Many “broken” lights are simply victims of tripped breakers or failed controls.
Check Circuit Breaker and Fuses
Head to your electrical panel and look for any tripped breakers. If one has flipped, reset it. For older systems, inspect for blown fuses. A sudden surge or moisture exposure can trip the circuit and cut power to the fixture.
Pro Tip: Label your breakers clearly. If the flood light keeps tripping, it may signal a short circuit or ground fault. Call an electrician in that case.
Test Switches and Controls
Flood lights often connect to photocells, motion detectors, or timers. These controls fail more often than the light itself.
- Photocell Test: Cover the sensor during daylight. The light should turn on. If it doesn’t, the sensor may be faulty.
- Bypass the Control: Temporarily disconnect the control and wire the light directly to power. If it works, replace the sensor or timer.
Verify Voltage with a Multimeter
Use a multimeter to test for power at the fixture’s input wires:
- Turn off power at the breaker.
- Remove the fixture cover.
- Turn power back on.
- Set multimeter to AC voltage.
- Touch probes to the input wires.
If no voltage reads, the issue is upstream. Check wiring, junction boxes, or the outlet if it’s a plug-in model.
Safety Note: Always turn off power before touching internal components. Double-check with your multimeter.
Inspect the Fixture Externally
Sometimes the fix requires no tools at all.
Clean the Lens and Housing
Dirt, dust, bird droppings, and pollen block a significant portion of light output. Over time, this makes a working light seem dim.
How to clean:
– Turn off power.
– Wipe the lens with a soft, damp cloth.
– Use mild soap for stubborn grime.
– Dry thoroughly before restoring power.
Avoid: Abrasive cleaners or high-pressure water, which can damage seals.
Look for Physical Damage
Inspect the housing for:
– Cracks or warping
– Loose mounting brackets
– Corroded terminals
– Water inside the lens
If water is visible, the seal has failed. Address this immediately to prevent further damage.
Diagnose Internal Components
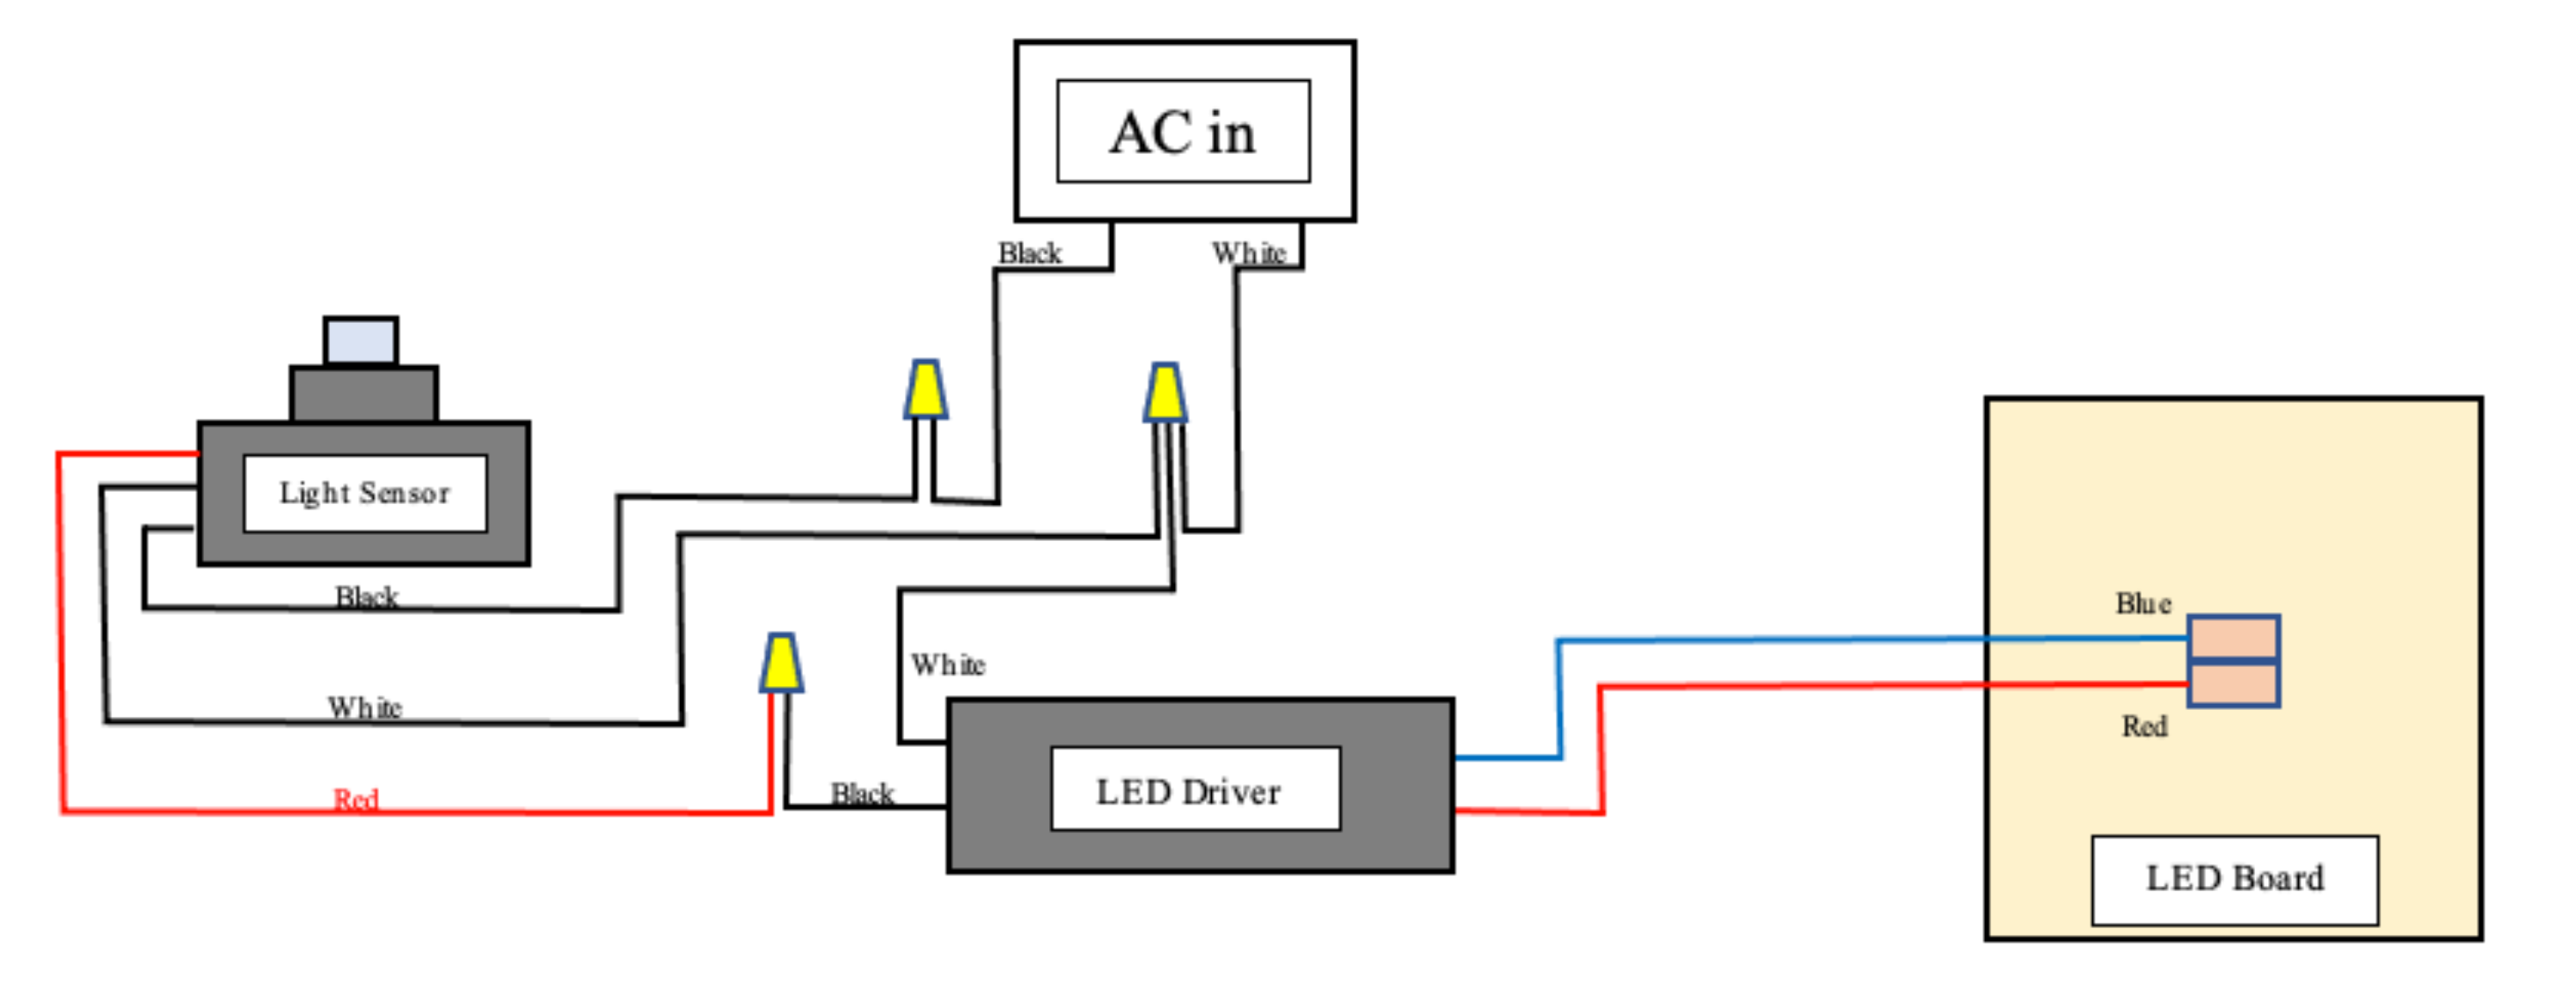
If power is confirmed and the fixture looks intact, open it up safely.
Warning: Opening a sealed LED flood light may void the warranty. Proceed only if out of warranty or if repair is urgent.
Turn Off Power at the Breaker
Never skip this step. Confirm power is off using a non-contact voltage tester.
Locate and Test the LED Driver
The LED driver converts AC power to low-voltage DC. It’s the most common point of failure in LED flood lights.
Signs of a bad driver:
– Light won’t turn on
– Flickering or pulsing
– Humming or buzzing noise
How to test:
1. Find the driver (usually a small black box inside the fixture).
2. Check input voltage (should match household supply).
3. Test output voltage (refer to label on driver).
If input voltage is good but output is zero or unstable, replace the driver.
Replacement Tip: Match voltage (V), current (mA), wattage (W), and physical size. Many universal drivers fit common fixtures.
Fix Flickering and Dimming Issues

Flickering is frustrating and can point to deeper electrical problems.
Incompatible Dimmer Switch
If your flood light flickers only when dimmed, the dimmer switch may not be LED-compatible.
Solution: Replace with an LED-rated dimmer (such as a trailing-edge model). Incandescent dimmers don’t work well with low-wattage LEDs.
Loose Wiring Connections
Loose wires cause arcing and intermittent contact.
Fix:
1. Turn off power.
2. Open the fixture and junction box.
3. Tighten all wire nuts and terminal screws.
4. Look for frayed or burnt wires. Replace if damaged.
Visual Cue: Blackened wire ends or melted insulation mean overheating occurred. Replace affected parts.
Voltage Fluctuations
If multiple lights flicker, the issue may be in your home’s electrical system.
What to do:
– Use a multimeter to monitor voltage over time.
– If voltage drops below 110V or spikes above 125V, contact an electrician.
– Consider a whole-house surge protector.
Address Overheating Problems
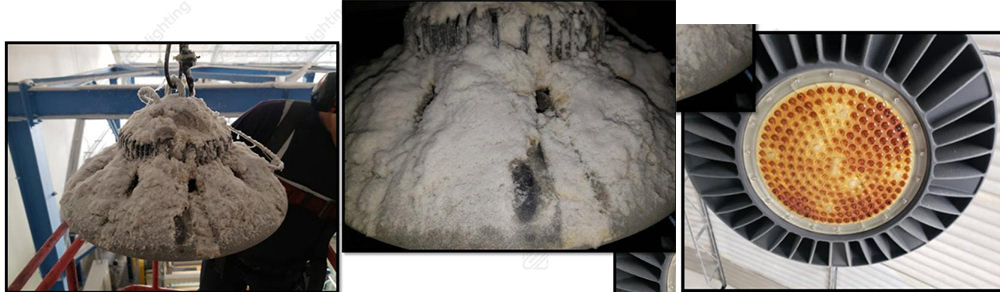
LEDs run cooler than old bulbs, but overheating still happens and shortens lifespan.
Clear Ventilation Blockages
Even small LED fixtures need airflow. Dust buildup or installation in enclosed spaces traps heat.
Prevention:
– Clean dust from heat sinks.
– Avoid installing near exhaust vents or enclosed soffits.
– Ensure mounting allows air circulation.
Verify Bulb or Module Wattage
Using a higher-wattage LED than the fixture allows causes overheating.
Check: Match replacement bulbs to the fixture’s maximum wattage rating.
Myth Busting: “LEDs don’t overheat.” False. While efficient, poor design or blocked vents lead to thermal stress and early failure.
Handle Water Damage and Corrosion

Moisture is a top killer of outdoor lights.
Dry Out a Wet Fixture
If you catch water early:
1. Turn off power.
2. Remove the cover.
3. Let it air-dry for 24–48 hours in a warm, dry place.
4. Wipe contacts with isopropyl alcohol.
5. Reassemble and test.
Inspect for Corrosion
Look for:
– White, green, or blue crust on metal parts
– Pitted or flaky terminals
– Rust on screws or brackets
If corrosion is minor: Clean with a wire brush and electrical contact cleaner.
If corrosion is on the driver or LED board: Replacement is usually the best option. Corrosion damages circuitry and creates unreliable connections.
Replace the LED Driver (Most Common Fix)
Replacing the driver is often the fastest, cheapest repair.
Tools You’ll Need
- Screwdriver
- Wire strippers
- Multimeter
- Replacement driver (match specs)
Step-by-Step Replacement
- Turn off power at the breaker.
- Remove fixture cover.
- Disconnect old driver (note wire positions).
- Connect new driver (input to power, output to LED board).
- Secure and reassemble.
- Restore power and test.
Time Estimate: 20–40 minutes.
Difficulty: Moderate (basic electrical skills required).Pro Tip: Buy a high-quality driver with surge protection, especially in storm-prone areas.
When to Replace the Entire Fixture
Not every flood light is worth fixing.
Replace If:
- LED board is burned or darkened: Repair cost exceeds new fixture price.
- Housing is cracked or seal is broken: Can’t be reliably resealed.
- Multiple components failed: Driver, board, and sensor all damaged.
- Fixture is over 5–7 years old: Newer models are brighter and more efficient.
- Warranty still valid: Contact manufacturer before risking voiding it.
Cost Tip: A quality LED flood light costs $30–$80. If repair parts exceed $50, replacement often makes more sense.
Prevent Future Problems
A little maintenance goes a long way.
Clean Lenses Every 6 Months
Dirt reduces brightness and traps heat. Clean with water and a soft cloth.
Inspect Seals Annually
Check gaskets and O-rings for cracks or brittleness. Replace if damaged.
Upgrade to Smart or Surge-Protected Fixtures
Modern options include:
– Motion-sensing LEDs with adjustable timers
– Wi-Fi enabled lights controllable via app
– Fixtures with built-in surge protection
These reduce stress on internal components and improve reliability.
Know When to Call an Electrician
Some issues are beyond DIY.
Call a Pro If:
- Voltage tests show supply problems
- Wiring in the wall or junction box is damaged
- The breaker trips repeatedly
- You’re unsure about connections or safety
Safety First: Electricity can be lethal. If in doubt, hire a licensed electrician.
Frequently Asked Questions About Flood Light Repair
What is the most common reason an LED flood light stops working?
The LED driver is the most common point of failure. It converts AC power to DC, and when it fails, the light won’t turn on, flickers, or cycles on and off.
Can I fix a flood light that has water inside?
Yes, if caught early. Turn off power, open the fixture, and let it dry for 24–48 hours. Clean contacts with isopropyl alcohol. If corrosion has reached the driver or LED board, replacement is the better option.
Why does my LED flood light flicker when dimmed?
Your dimmer switch is likely incompatible with LED loads. Replace it with an LED-rated dimmer (trailing-edge type) designed for low-wattage LEDs.
How do I know if the LED driver or LED board is bad?
Test the driver with a multimeter. If input voltage is present but output is zero or unstable, the driver is bad. If the driver works but the light still fails, inspect the LED board for dark spots or burn marks.
Is it worth repairing an old LED flood light?
It depends on the failure. Driver replacement is cost-effective. But if the LED board is burned, the housing is cracked, or the fixture is over 5–7 years old, buying a new unit is usually smarter.
Can I open a sealed LED flood light without voiding the warranty?
Usually no. Opening sealed fixtures typically voids the warranty and can compromise waterproof ratings. Contact the manufacturer first if your unit is still under warranty.
Key Takeaways for Fixing Your Flood Light
Most flood light problems are fixable with basic tools and a $20 driver. Start with power checks, then inspect connections and controls. Replace the driver if needed. But if the LED board is damaged or the housing is compromised, skip the repair and install a new, efficient LED flood light instead. With proper care, your new light can last 10+ years, keeping your property safe and well-lit.