
You just installed a motion sensor flood light, or you’re about to, and you want it to work exactly right from day one. A properly calibrated sensor boosts home security, lights up dark driveways, and deters unwanted visitors without flickering on every time the wind blows. But skip the setup steps and you’ll end up with a light that ignores you at the door or triggers nonstop for passing cars.
The secret lies in mastering three controls: LUX, TIME, and SENSITIVITY. These settings decide when your flood light activates, how long it stays on, and what kind of movement it responds to. Get them dialed in, and your light becomes a set-it-and-forget-it security asset.
This guide breaks down every step to set a motion sensor flood light for accurate detection, fewer false alarms, and dependable nighttime performance.
Adjust the Three Core Sensor Settings

Every motion sensor flood light comes with built-in controls that shape its behavior. Most models include three dials: LUX, TIME, and SENSITIVITY (SEN). Setting them in the right order saves time and frustration during testing.
Start With LUX in Day Mode
Begin by turning the LUX dial fully toward the sun icon. This forces the sensor to activate in bright conditions, which makes daytime testing possible. If the LUX is set to moon from the start, the light won’t respond until full darkness, leaving you unable to confirm motion detection until nighttime.
Pro Tip: Think of LUX as a darkness threshold. The closer to moon, the darker it must be before the sensor activates.
Set TIME to the Shortest Duration
Rotate the TIME dial to the minimum setting, usually marked with a minus sign. This controls how long the light stays on after detecting motion, ranging from about 10 seconds to 10 minutes depending on the model. A short duration lets you run multiple test triggers quickly without long waits between cycles.
Lower Sensitivity for First Tests
Turn the SENSITIVITY dial down to medium or low. High sensitivity picks up small movements like squirrels or swaying branches, causing false triggers during testing. Starting mid-range keeps the sensor responsive to human-sized motion while avoiding overreaction.
Power On and Aim the Sensor
With the dials set, it’s time to bring the light to life and direct it where coverage matters most.
Switch On the Power
Flip the wall switch or circuit breaker to on. The light won’t activate immediately unless motion occurs, unless the unit has a manual override mode. Give the sensor a few seconds to initialize.
Position the Sensor Head
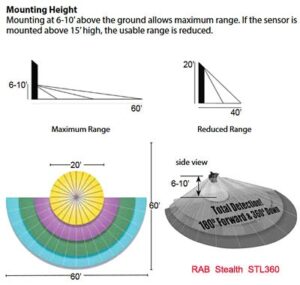
Aim the sensor toward the area you want to monitor, such as a front door, side gate, or driveway. Most units tilt vertically and rotate horizontally. Use the adjustable brackets to shape the detection zone precisely.
Visual Cue: Look for arrows or markings on the sensor housing. Many sensors cover 120 to 180 degrees and detect motion up to 30 feet away.
Avoid pointing the sensor:
– Directly at roads or sidewalks to reduce passing-vehicle triggers
– Toward trees, bushes, or flags where moving foliage causes false detection
– At reflective surfaces like windows or car hoods that can bounce infrared signals
Run a Walk Test to Map Coverage
Now you’ll see exactly how your sensor responds to movement. A walk test reveals dead spots and overreach before they become problems.
Walk Through the Detection Zone
Move through the target area at a normal pace, not running or tiptoeing. Start from the farthest point you want covered and walk toward the light. Cross the detection zone from multiple angles: straight on, diagonal, and from the edges.
- Success: Light turns on instantly and stays lit while you move.
- Missed Trigger: No response means the angle is off or sensitivity is too low.
- Delayed Response: Slow activation signals the sensor needs repositioning or a sensitivity bump.
Expert Note: Walk at least 6 to 10 feet from the sensor’s edge to simulate a realistic approach distance.
Check the Side and Peripheral Zones
Move to the far left and right of the intended coverage area. If the light only activates when you’re directly in front, adjust the horizontal aim to widen side detection. Some models include focusing lenses or shields that narrow or expand the field. Use these to block out unwanted zones like neighboring yards.
Calibrate LUX at Dusk for Real-World Performance
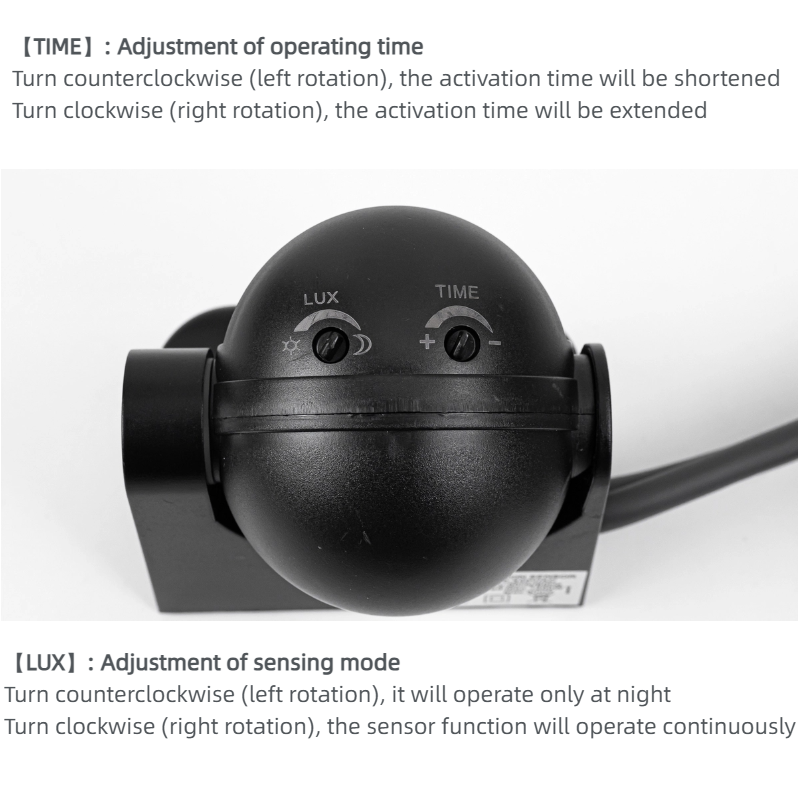
Settings tested in daylight often behave differently after dark. The final LUX calibration should happen when ambient light matches your target activation conditions.
Wait for Evening Light Levels
Return to the sensor at dusk or after full dark, when you want automatic activation. This is the ideal window to fine-tune the LUX setting for actual use.
Set the Darkness Threshold
Turn the LUX dial all the way to moon (maximum darkness). Wait 30 to 60 seconds for the sensor to reset. Then slowly rotate the dial toward sun until the light activates.
- If it turns on right away, you’ve found the trigger point.
- If not, keep adjusting slightly until it responds.
This sets the sensor to activate only when it’s dark enough, preventing daytime triggers while ensuring nighttime reliability.
Common Issue: Nearby streetlights or porch lights can fool the sensor into thinking it’s still daylight. In that case, set LUX closer to moon to override external lighting.
Fine-Tune TIME and Sensitivity

With positioning and LUX locked in, adjust how long the light stays on and what kind of motion triggers it.
Choose Your Preferred On-Time
Use the TIME dial to set how long the light remains on after motion stops. Most models offer a range from 10 seconds to 10 minutes.
Recommended durations:
– Entryway or porch: 1 to 2 minutes, enough time to unlock the door
– Driveway or garage: 3 to 5 minutes for longer approaches
– Security zones: 5 to 10 minutes to deter loitering
Turn the dial toward + to increase time and – to decrease it.
Energy Tip: Longer durations use more electricity. Balance convenience against efficiency.
Adjust Sensitivity to Cut False Alarms
Gradually raise the SENSITIVITY dial until the light detects a person at your desired range. Test again with both slow and fast movement.
Watch for these triggers:
– Pets under 20 lbs activating the light, which means lowering sensitivity
– Wind-blown objects setting it off, which calls for repositioning or shielding
– Distant motion like neighbors walking by, which requires reducing range via aim or SEN
Pro Tip: In areas near roads, set sensitivity lower and aim the sensor downward to ignore distant movement.
Prevent Common Sensor Problems
Even a well-set sensor can develop issues over time. Sidestep these frequent pitfalls to keep your flood light reliable.
Avoid Heat and Airflow Interference
Don’t install the sensor near:
– Exhaust vents, since hot air mimics body heat
– HVAC units, where airflow causes false motion
– Stove pipes or dryer vents, where heat bursts trigger sensors
PIR (passive infrared) sensors detect body heat, so sudden temperature changes can trick them.
Keep the Lens Clean
Dust, spider webs, snow, or condensation can block or distort the sensor’s view. Clean the lens every 3 to 6 months with a soft cloth and mild soap.
Visual Check: If the lens looks foggy or has cobwebs, wipe it gently. Never use abrasive cleaners.
Shield from Harsh Weather
While outdoor sensors are weather-resistant, direct rain or snow on the lens can cause malfunctions. Install under an eave or use a weather shield if the fixture is fully exposed.
Use Manual Override for Constant Light
Some motion sensor flood lights include a manual override feature for times when you need steady illumination.
Switch to ON or Test Mode
Check the switch on the fixture or wall:
– ON: Light stays on regardless of motion or daylight.
– TEST: Disables LUX control so the light activates only on motion, even in daylight.
– AUTO: Normal operation with motion plus darkness required.
Use ON for parties, outdoor repairs, or holiday lighting. Remember to switch back to AUTO afterward to restore energy savings.
Note: Not all models have a three-way switch. Consult your manual if the options aren’t clearly labeled.
Troubleshoot When the Light Misbehaves
Even after careful setup, issues can pop up. Here’s how to fix the most common problems.
Light Never Turns On
Check these basics first:
– Power switch is on
– Circuit breaker hasn’t tripped
– Bulb or LED is functional, replace if needed
– Sensor isn’t covered or obstructed
If power is confirmed, set the switch to ON mode. If the light still doesn’t activate, the fixture may be faulty.
Light Stays On Constantly
Common causes include:
– LUX set to sun with high sensitivity
– Sensor exposed to heat sources like vents or grills
– Internal malfunction or short circuit
Fix it by turning LUX toward moon, repositioning away from heat, or powering off for 30 seconds to reset the unit.
Frequent False Triggers
If the light turns on randomly:
– Lower the SENSITIVITY setting
– Reposition away from moving plants or traffic
– Clean the lens
– Block small animal pathways if possible
Maintain Performance Over Time
%20Maintenance%20Checklist%20(1)%20(1).png)
A one-time setup isn’t enough. Regular maintenance keeps your motion sensor flood light working like new.
Schedule Quarterly Checks
Every three months:
– Perform a walk test
– Clean the lens and housing
– Verify aim and coverage
– Test TIME and LUX response
Seasonal Tip: Recheck settings in spring and fall when daylight hours shift significantly.
Consider Upgrades for Better Control
Look for models with:
– Dusk-to-dawn sensors with adjustable lux thresholds
– Pet immunity that ignores animals under 40 lbs
– Remote controls or app integration for smart sensors
– Customizable zones via lens masks or digital settings
These features reduce false alarms and offer greater flexibility for tricky installations.
Frequently Asked Questions About Motion Sensor Flood Lights
How do I stop my motion sensor flood light from turning on during the day?
Adjust the LUX dial toward the moon icon. This raises the darkness threshold so the sensor only activates when ambient light drops below your preferred level. If nearby streetlights interfere, set LUX even closer to moon.
Why does my motion sensor light stay on all the time?
The most common causes are LUX set to sun mode, exposure to heat sources like vents, or an internal malfunction. Turn LUX toward moon, reposition away from heat, and power off the fixture for 30 seconds to reset it.
How far can a motion sensor flood light detect movement?
Most sensors cover 120 to 180 degrees and detect motion up to 30 feet away. Detection range depends on the SENSITIVITY setting, mounting height, and angle of aim.
Can small animals trigger a motion sensor flood light?
Yes, especially on high sensitivity. PIR sensors detect body heat and movement, so pets, squirrels, or raccoons can activate the light. Lower the SENSITIVITY dial or aim the sensor away from areas where animals travel.
How long should I set the light to stay on?
For entryways, 1 to 2 minutes is usually enough. Driveways benefit from 3 to 5 minutes. Security zones can run 5 to 10 minutes. Longer durations use more energy, so match the setting to the location’s purpose.
Do all motion sensor flood lights have a manual override?
No. Some models include a three-way switch with ON, TEST, and AUTO modes, while others only have AUTO. Check your product manual to confirm whether manual override is available.
Key Takeaways for Setting Your Motion Sensor Flood Light
Setting a motion sensor flood light takes less than 30 minutes but delivers years of reliable security and convenience. Start by setting LUX to day mode, TIME to minimum, and SENSITIVITY to low for easy testing. Power on the fixture, aim the sensor away from roads and foliage, and run a walk test to map coverage. Fine-tune LUX at dusk so the light activates only when truly dark, then adjust TIME and SENSITIVITY to match your specific location. Clean the lens every few months and recheck settings seasonally to keep performance sharp.
Your next step: grab a ladder, set those three dials, and run a walk test tonight. You’ll know within minutes whether your motion sensor flood light is ready to protect your home or needs another round of adjustments.