
Adding a second outdoor flood light is one of the smartest upgrades for home security and nighttime visibility. Whether you want to illuminate a dark driveway or light up both sides of a garage, wiring two flood lights together is a manageable DIY project. The key is choosing the right wiring method, matching your wire gauge to the circuit, and following safe connection practices. This guide covers both the daisy-chain and junction box approaches, plus how to avoid code violations and common electrical mistakes.
Before touching any wires, shut off power at the breaker panel and verify it with a non-contact voltage tester. Working on a live circuit is never worth the risk. With the right materials and a clear plan, you can have both flood lights working in sync within a few hours.
Choose the Right Wire Gauge for Your Circuit
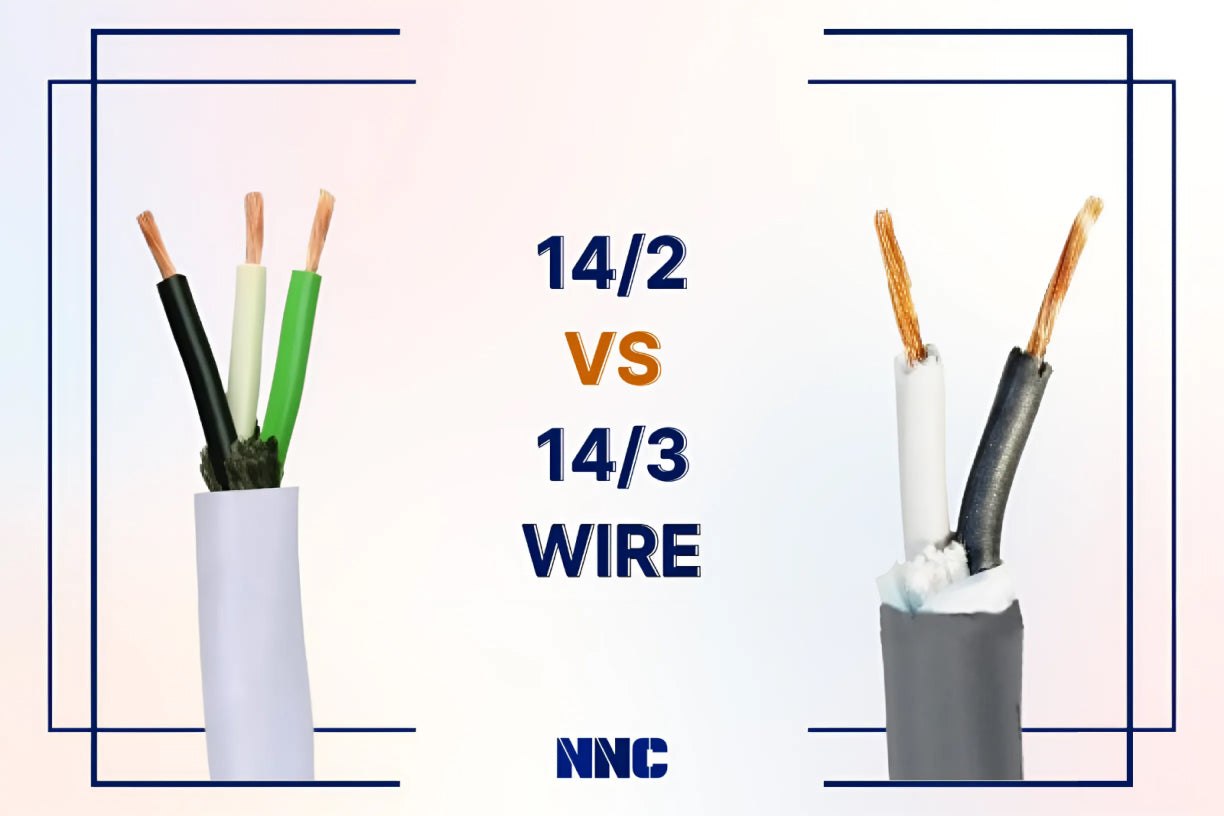
The wire you use must match your circuit breaker to prevent overheating and fire hazards.
Match Wire to Breaker Amperage
Your cable choice depends on the breaker protecting the circuit:
– 14/2 NM-B with ground: Use on 15-amp circuits. Safe for up to 1,440 watts of total load.
– 12/2 NM-B with ground: Required for 20-amp circuits, but acceptable on 15-amp circuits when matching existing wiring.
Check the cable sheath for printed specs like “14/2” or “12/2.” Never install 14-gauge wire on a 20-amp breaker.
Select the Correct Cable for Outdoor Runs
If your cable will be exposed to weather under eaves or along siding, standard Romex is not code-compliant.
– Use UF-B (Underground Feeder) cable for direct weather exposure.
– Alternatively, run indoor-rated cable through PVC conduit for added protection.
UF cable resists moisture and UV damage, making it ideal for any exterior run.
Pick the Best Wiring Method for Your Setup
You have two reliable options: daisy-chaining or splitting power from a central junction box.
Daisy-Chaining Lights Directly

This method works best when the second light is close to the first.
When Daisy-Chaining Makes Sense
- The second light is within 20 feet of the first fixture.
- The first fixture’s electrical box has room for extra wire connections.
- You are only adding one additional light.
Connect the First Light to the Second
- Run 14/2 or 12/2 cable from the first flood light to the second.
- At the first light, join all black wires together, all white wires together, and all ground wires together.
- At the second light, connect black to black, white to white, and ground to ground.
- Secure every splice with wire nuts and tug-test each connection.
⚠️ Warning: If the first fixture’s box feels cramped, switch to the junction box method instead.
Central Junction Box Split

This approach is better for multiple lights or fixtures that are far apart.
Why Use a Junction Box
- You are wiring lights on opposite corners of the house.
- The existing fixture boxes lack space for extra wires.
- You plan to expand the system later.
A deep metal junction box safely houses multiple cable connections and meets NEC requirements.
Install a 4-Inch Square Junction Box
- Mount the box in the attic or on a stud near the power source.
- Choose a deep 4-inch square or 4-11/16-inch box rated for at least three to four cable entries.
- Use metal boxes when possible for durability and grounding integrity.
Feed Power Through the Junction Box
Locate the Correct Power Source
Two common scenarios exist:
– Power enters at the switch: Hot wire travels from the panel to the switch, then a “switched hot” continues to the light.
– Power enters at the fixture: Hot and neutral arrive at the light first, and a switch loop breaks the hot leg.
Use a non-contact voltage tester to identify which wire is switched. Test with the switch off and on to see when power appears.
✅ Pro Tip: Always splice into the switched hot so your new lights respond to the existing switch.
Wire the Junction Box Correctly
Ground the Metal Box
Grounding the metal box is required by code and prevents shock hazards.
- Strip the ground wires from every cable entering the box.
- Twist them together with a 6-inch bare copper pigtail.
- Attach the pigtail to the green grounding screw inside the box.
- Cap the full ground bundle with a wire nut.
This bonds the metal box directly to the circuit ground.
Splice Hot and Neutral Wires
- Connect all black (hot) wires together inside the box.
- Connect all white (neutral) wires together.
- Use appropriately sized wire nuts for bundles of three or more wires.
Leave about 8 inches of slack inside the box to allow for future repairs.
Verify Circuit Load Capacity Before Connecting
Overloading a circuit causes tripped breakers and potential overheating.
Calculate Your Total Fixture Load
- LED flood lights: typically 20 to 50 watts each, so two lights draw only 40 to 100 watts.
- Halogen or incandescent flood lights: often 500 watts each, totaling 1,000 watts for two fixtures.
On a 15-amp circuit, the safe continuous load is 1,440 watts (80% of the 1,800W maximum). Two 500W halogens fit within this limit, but adding a third would push the circuit past safe capacity.
✅ Good News: Modern LEDs let you add many lights without worrying about overload.
Maintain Consistent Wire Gauge
If your existing wiring is 12-gauge, you can use 14-gauge for new extensions only if the circuit breaker is 15 amps. If the breaker is 20 amps, every wire on the circuit must be 12-gauge. Mismatched gauges on a 20-amp breaker create serious fire risks.
Run and Secure the Cable Properly
Correct cable routing protects the wire and keeps your installation code-compliant.
Use Attic Space for Long Runs
- Feed cable from the junction box through the attic to reach the second light location.
- Drill down through the top plate into the exterior wall.
- Protect the wire where it exits into the fixture housing.
Attic runs shield the cable from weather and physical damage.
Staple Cables According to NEC
- Secure cable within 12 inches of the junction box.
- Staple every 4.5 feet thereafter in open areas like attics.
- Use insulated staples to avoid damaging the cable sheathing.
Connect the Second Flood Light

Finish the installation by wiring the new fixture correctly.
Mount the Fixture First
Choose a fixture rated for wet or damp locations with a UL listing for outdoor use. Drill pilot holes, attach the mounting bracket, and route the cable into the back or side entry point.
Make Final Wire Connections
At the second flood light:
– Connect black to black (hot).
– Connect white to white (neutral).
– Connect bare copper to the green ground screw or ground wire.
Tuck wires neatly into the housing and avoid pinching them when mounting the fixture.
✅ Visual Check: No bare copper should be visible outside the wire nuts.
Test the System Safely Before Closing Up
Never skip testing after wiring.
Restore Power and Operate the Switch
- Double-check every connection.
- Replace covers on junction and fixture boxes.
- Turn the breaker back on.
- Flip the switch.
Both lights should illuminate at the same time.
Troubleshoot Common Issues
Light Doesn’t Turn On
- Check voltage at the switch to confirm power is arriving.
- Test continuity at the junction box with a multimeter.
- Inspect wire nuts for loose splices.
Only One Light Works
- A loose neutral or hot connection is the likely cause.
- Reopen the non-working fixture and recheck the black and white connections.
Breaker Trips Immediately
- A short circuit from damaged wire or miswiring is the probable cause.
- Disconnect the second light and retest.
- Confirm no bare wires are touching metal components.
Follow Essential Safety Best Practices
Always Shut Off Power First
- Turn off the correct breaker before starting any work.
- Test wires at the switch and fixture with a non-contact voltage tester.
- Lock the breaker panel if others are nearby.
Never Rely on Mounting Brackets for Grounding
Residential electrical systems require a dedicated ground wire. Do not assume the metal bracket grounds the fixture. Always connect the bare copper wire to the fixture’s ground terminal.
Prevent Overheating and Overloads
Avoid Box Overcrowding
Too many wires in a small box trap heat and increase fire risk. Use a deep 4-inch square box for three or more cables. Calculate box fill by adding up wire counts and comparing to the box’s cubic-inch capacity. Each 14-gauge wire counts as 2 cubic inches, while all ground wires together count as a single wire.
Leave Service Slack in Every Box
Keep 8 inches of extra wire inside every box. This allows for future repairs without splicing in extensions. Cutting wires too short forces you to install an additional junction box.
Final Tips for a Successful Installation
Label Your Circuits
Mark the breaker clearly with something like “Front Porch Flood Lights.” This helps during future maintenance and prevents accidental power-on.
Consider Smart Controls
Replace the standard switch with a smart motion-sensing switch for scheduling and remote control. The wiring stays the same; only the switch changes.
Use Weatherproof Covers
Install a gasketed, weather-resistant cover on any junction box exposed to moisture. This prevents water intrusion over time.
Frequently Asked Questions About Wiring Two Flood Lights Together
Can I wire two flood lights to one switch?
Yes. You can connect two flood lights to a single switch using either a daisy-chain or junction box method. Both lights will turn on and off together as long as the total wattage stays within the circuit’s safe load capacity.
What wire gauge should I use for outdoor flood lights?
Use 14/2 NM-B for 15-amp circuits or 12/2 NM-B for 20-amp circuits. For exterior runs exposed to weather, use UF-B cable or run standard cable through PVC conduit to meet code requirements.
Do I need a junction box to connect two flood lights?
Not always. If the second light is close and the first fixture’s box has room, daisy-chaining works fine. A junction box is better when lights are far apart, when the existing box is crowded, or when you plan to add more fixtures later.
How many watts can a 15-amp circuit handle?
A 15-amp circuit can safely support up to 1,440 watts of continuous load, which is 80% of the 1,800W maximum. Two 500W halogen flood lights total 1,000 watts, leaving room for additional fixtures if they are LEDs.
Can I mix 14-gauge and 12-gauge wire on the same circuit?
Yes, but only if the circuit breaker is 15 amps. If the breaker is 20 amps, every wire on the circuit must be 12-gauge. Mixing gauges on a 20-amp circuit creates a fire hazard because the thinner wire can overheat.
Is it safe to run Romex outside for flood lights?
Standard Romex (NM cable) is not rated for direct weather exposure. For outdoor runs, use UF-B cable or run Romex through PVC conduit to protect it from moisture and UV damage.
Key Takeaways for Wiring Two Flood Lights Together
Wiring two flood lights together comes down to three essential steps: match your wire gauge to the breaker amperage, choose the right connection method for your layout, and ground every metal box and fixture properly. Daisy-chaining works well for short runs between nearby fixtures, while a central junction box is the better choice for distant lights or future expansion.
Before flipping the breaker back on, double-check every splice, confirm no bare copper is exposed, and verify that your total wattage stays below 1,440 watts on a 15-amp circuit. Label your breaker for easy identification, and consider upgrading to a smart or motion-sensing switch for added convenience. With careful planning and attention to safety, you can install two reliable flood lights that boost your home’s security and visibility for years to come.